Async-Await and the UI thread

frozen-computerA few weeks ago I shared my experience of moving from web development to mobile development. In this article I mentioned asynchronous programming which is mandatory for desktop and mobile applications.

Today I will give you an example to demonstrate how to use the async-await pattern in order to avoid having a User Interface (UI) that freezes (does not respond to user interaction).

The synchronous approach

In this demo, I have created a simple WPF application with a button and a label, I will not use the Model-View-ViewModel (MVVM) pattern in this example. When clicking on the button some data will be retrieved on a repository and processed by a service before updating the label with the value.

main-window

Here is the XAML for this window:

<Window x:Class="AsyncAwait.WPF.MainWindow"
        xmlns="http://schemas.microsoft.com/winfx/2006/xaml/presentation"
        xmlns:x="http://schemas.microsoft.com/winfx/2006/xaml"
        xmlns:d="http://schemas.microsoft.com/expression/blend/2008"
        xmlns:mc="http://schemas.openxmlformats.org/markup-compatibility/2006"
        xmlns:local="clr-namespace:AsyncAwait.WPF"
        mc:Ignorable="d"
        Title="MainWindow" Height="350" Width="525">
    <Grid>
        <Button x:Name="button" Content="Button" HorizontalAlignment="Left" Margin="10,10,0,0" VerticalAlignment="Top" Width="497" Click="button_Click"/>
        <Label x:Name="label" Content="Label" HorizontalAlignment="Left" Margin="10,45,0,0" VerticalAlignment="Top" Width="497"/>
    </Grid>
</Window>

And the C# code can be found below.

// MainWindow.xaml.cs
public partial class MainWindow : Window
{
    public MainWindow()
    {
        _domainService = new DomainService();
        InitializeComponent();
    }
 
    private readonly DomainService _domainService;
 
    private void button_Click(object sender, RoutedEventArgs e)
    {
        var labelData = _domainService.GetData();
        this.label.Content = labelData;
    }
}
 
// DomainService.cs
public class DomainService
{
    public DomainService()
    {
        _dataRepository = new DataRepository();
    }
 
    private readonly DataRepository _dataRepository;
 
    public string GetData()
    {
        var data = _dataRepository.RetrieveData();
        data = ComputeData(data);
        return data;
    }
 
    private string ComputeData(string data)
    {
        Thread.Sleep(5000); // mocking calculation latency
        return data.ToUpper();
    }
}
 
// DataRepository.cs
public class DataRepository
{
    public string RetrieveData()
    {
        return RetrieveDataInternal();
    }
 
    private string RetrieveDataInternal()
    {
        Thread.Sleep(5000); // mocking latency
        return "my data";
    }
}

I used the Thread.Sleep() method to mock latency, due to database/network access and calculation time.

From a syntax point of view the code compile and does what it needs to do. But when we launch this program, the UI will freeze for 10 seconds and will not respond to the user interactions. This clearly not the best experience for a software.

The application has this behavior because all the work is done on the UI thread and it won’t be able to do its main work: displaying and refreshing the UI (responding to the user inputs is part of it).

It is time to update the code to make the code asynchronous.

Using Async-Await

I refactored the previous code to be able to use the async and await keywords.

// MainWindow.xaml.cs
public partial class MainWindow : Window
{
    public MainWindow()
    {
        _domainService = new DomainService();
        InitializeComponent();
    }
 
    private readonly DomainService _domainService;
 
    private async void button_Click(object sender, RoutedEventArgs e)
    {
        try
        {
            var labelData = await _domainService.GetDataAsync();
            this.label.Content = labelData;
        }
        catch (Exception ex)
        {
            MessageBox.Show(ex.Message);
        }
    }
}
 
// DomainService.cs
public class DomainService
{
    public DomainService()
    {
        _dataRepository = new DataRepository();
    }
 
    private readonly DataRepository _dataRepository;
 
    public async Task<string> GetDataAsync()
    {
        var data = await _dataRepository.RetrieveDataAsync();
        data = ComputeData(data);
        return data;
    }
 
    private string ComputeData(string data)
    {
        Thread.Sleep(5000); // mocking calculation latency
        return data.ToUpper();
    }
}
 
// DataRepository.cs
public class DataRepository
{
    public Task<string> RetrieveDataAsync()
    {
        return RetrieveDataInternalAsync();
    }
 
    private Task<string> RetrieveDataInternalAsync()
    {
        Thread.Sleep(5000);
        return Task.FromResult("my data");
    }
}

Great! It should be better this way, let’s try it… It still freeze for 10 seconds… Even with the async-await pattern!

That is normal, the program does not create a Task on a separate thread and therefore all the code is still executed on the UI thread. Only using the async/await keywords is not enough to make the code asynchronous. Some methods of the .NET framework will create tasks on separate thread to allow you to use this pattern, like the GetAsync() method of the HttpClient class (see more examples here). You can detect them by looking at the “Async” suffix in the method name, it is a convention to use this suffix to notify calling code that the method is “awaitable”.

In my case I will fix my problem by creating a new Task with the Task.Run() method:

// DataRepository.cs
private Task<string> RetrieveDataInternalAsync()
{
    return Task.Run(() =>
    {
        Thread.Sleep(5000); // mocking latency
        return "my data";
    });
}

This gives me a Task I can use in my class hierarchy to run the code asynchronously. Now if we run the program it is better but the UI will still freeze for about 5 seconds…

This is caused by the ComputeData() method in the DomainService class which is executed on the UI thread. Well, I can use another Task.Run() to solve this problem. True but I can also use another feature of the Task to solve my issue: Task.ConfigureAwait():

// DomainService.cs
public async Task<string> GetDataAsync()
{
    var data = await _dataRepository.RetrieveDataAsync().ConfigureAwait(false);
    data = ComputeData(data);
    return data;
}

The parameter of the ConfigureAwait method (named “continueOnCaptureContext”) allows us to specify if we want that the rest of the method to executed on the captured context or not. This refers to the calling thread which is the UI thread in my case. By default this value is set to true and that means that the ComputeData() method was executed on the UI thread which explains why the application froze.

Now, if we run the application, the label will still be updated after 10 seconds but the Window will be responding to the user interactions which is, in my opinion way better for the user experience.

This ConfigureAwait tip looks great, let me use it on the button_Click() method!

// MainWindow.xaml.cs
private async void button_Click(object sender, RoutedEventArgs e)
{
    try
    {
        var labelData = await _domainService.GetDataAsync().ConfigureAwait(false);
        this.label.Content = labelData;
    }
    catch (Exception ex)
    {
        MessageBox.Show(ex.Message);
    }
}

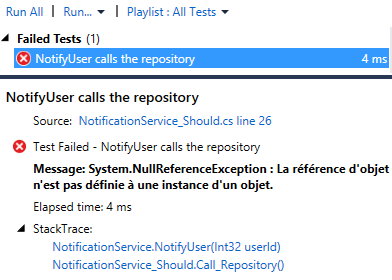
But when I run the program, I have the following result:

main-window-failed

I have an InvalidOperationException with the following message: “The calling thread cannot access this object because a different thread owns it”, displayed in a message box (in French in my case due to my configuration).

This error happens because I try to access the label property of the MainWindow from a thread different from the UI one. This is caused by the ConfigureAwait(false) I put, in this case I don’t want it because the code needs to be executed on the captured context.

Conclusion

Working with the async/await pattern needs practice to be understood, I wrote this article to explains some concepts of it by showing its impacts on a UI interface. I do not claim to be an expert on the subject, there is a lot more I need to learn on this topic. But remember that you need a Task to work with to unlock the potential of this pattern.

The Task.ConfigureAwait() method is also a powerful ally to lighten the work done by the UI thread but it needs to be used carefully to avoid invalid operations in the application.

The async keywork can only be used on methods returning a Task, a Task<T>, or void. This last case can be dangerous and should be avoided as much as possible, in my case the only async void method is the button_click event handler. I took care of encapsulating the whole code in a try/catch block and every time you see an async void method you should do it as well. Because it behaves as a “fire and forget” call and if you do not handle the exceptions in the method, they will be raise later without knowing exactly when or where and it will likely stop the process and the application.

I hope this example can help you if you are starting with asynchronous programming in C# .NET.

See you next time!


Image credits:

logo


Easy mocking with NSubstitute

NSubstitute logo
NSubstitute logo

Several months ago I introduced the concept of mocking dependencies of a class in order to ease the writing of tests for it. I also introduced the Moq library which is a mocking library and today I will introduced another one: NSubstitute. This project is open source and you can find it on GitHub.

I will not cover all the functionalities it offers, instead I will show you how it works with an example like I did with Moq. First you can install NSubstitute with Nuget:

Install-Package NSubstitute

What to test?

I have created the following service with a bit of logic to test.

public class NotificationService
{
    public NotificationService(IUserRepository userRepository, INotifier notifier, ILogger logger)
    {
        _userRepository = userRepository;
        _notifier = notifier;
        _logger = logger;
    }
 
    private readonly IUserRepository _userRepository;
    private readonly INotifier _notifier;
    private readonly ILogger _logger;
 
    public void NotifyUser(int userId)
    {
        User user;
        try
        {
            user = _userRepository.GetById(userId);
        }
        catch (Exception ex)
        {
            _logger.Error(ex.Message);
            return;
        }
        if (user.HasActivatedNotification)
        {
            _notifier.Notify(user);
        }
    }
}

This service relies on dependency injection to do its work, you’ll find these dependencies below.

public interface INotifier
{
    void Notify(User user);
}
 
public interface IUserRepository
{
    User GetById(int userId);
}
 
public interface ILogger
{
    void Error(string message);
}
 
public class User
{
    public bool HasActivatedNotification { get; set; }
}
 
public class InvalidUserIdException : Exception
{
    public override string Message
    {
        get { return "Given user ID is invalid"; }
    }
}

Let’s test it!

I will now write tests to cover the logic hold by the NotificationService class using NSubstitute. I will also use xUnit as testing framework, you can find more information about this project here.

In order to test the service we will have to instantiate it, and therefore we will have to inject the dependencies. So the first question is: how to create mock (or substitute) with NSubstitute? As a reminder it is done like this with Moq:

Mock<IUserRepository> mockRepository = new Mock<IUserRepository>();
IUserRepository repo = mockRepository.Object;

With NSubstitute the concept is similar but with one noticeable change.

IUserRepository userRepository = Substitute.For<IUserRepository>();

There is no wrapper for the mock, we directly manipulate an instance of the interface we want to substitute. You might wonder how to use it as a mock if it has only the methods defined in the interface, I’ll come to that later.

We can now setup our test class for the service with all the dependencies.

public class NotificationService_Should
{
    private readonly NotificationService _service;
 
    private readonly IUserRepository _userRepository;
    private readonly INotifier _notifier;
    private readonly ILogger _logger;
 
    public NotificationService_Should()
    {
        _userRepository = Substitute.For<IUserRepository>();
        _notifier = Substitute.For<INotifier>();
        _logger = Substitute.For<ILogger>();
 
        _service = new NotificationService();
    }
}

For information, the test setup is done in the class constructor with xUnit.

We can now focus on writing the first test for the class: verifying that the repository is called when executing the NotifyUser method. To do so we will use some extension methods provided by NSubstitute (here is the answer to the previous question).

[Fact(DisplayName = "NotifyUser calls the repository")]
public void Call_Repository()
{
    _service.NotifyUser(Arg.Any<int>());
    _userRepository.Received().GetById(Arg.Any<int>());
}

The Received() extension method checks that the following method is called. Since we don’t have to test for a particular user ID, we can use the Arg.Any<T>() method to specify that any integer is valid (with Moq it is It.IsAny<T>()). We run the test and…

Red-Test-Null

…it’s red? NullReferenceException… Of course! The mock repository does not return any instance of User and the execution fails after when trying to use the reference. Let’s fix this by configuring the substitute.

[Fact(DisplayName = "NotifyUser calls the repository")]
public void Call_Repository()
{
    _userRepository.GetById(Arg.Any<int>()).Returns(new User());
    _service.NotifyUser(1);
    _userRepository.Received().GetById(Arg.Any<int>());
}

Now the test is green, but in this test we setup a mock and then we test that it has been called, in my opinion it is not very constructive. We should try to focus on testing something else, the rest of the method’s logic depends on a property of the User, let’s test this for instance.

public NotificationService_Should()
{
    _userRepository = Substitute.For<IUserRepository>();
    _notifier = Substitute.For<INotifier>();
    _logger = Substitute.For<ILogger>();
 
    _service = new NotificationService(_userRepository, _notifier, _logger);
 
    _userRepository
        .GetById(Arg.Is<int>(i => i < 10))
        .Returns(new User { HasActivatedNotification = true });
    _userRepository
        .GetById(Arg.Is<int>(i => i >= 10))
        .Returns(new User { HasActivatedNotification = false });
}
 
[Fact(DisplayName = "NotifyUser calls notifier if user has activated the notifications")]
public void Call_Notifier_When_User_Has_Activated_Notification()
{
    _service.NotifyUser(1);
    _notifier.Received().Notify(Arg.Any<User>());
}
 
[Fact(DisplayName = "NotifyUser does not call notifier if user has not activated the notifications")]
public void Does_Not_Call_Notifier_When_User_Has_Not_Activated_Notification()
{
    _service.NotifyUser(11);
    _notifier.DidNotReceive().Notify(Arg.Any<User>());
}

This time I used the Arg.Is<T>() method to add condition to the substitute, this way I can setup the result of a method depending on some conditions. Here I set the HasActivatedNotification property to true if the userId is inferior to 10 and to false otherwise.

And to test that a method is not called I use the DidNotReceive() extension method. Now I will write a test for the case when an exception is thrown by the repository to check that the logger is correctly called.

public NotificationService_Should()
{
    _userRepository = Substitute.For<IUserRepository>();
    _notifier = Substitute.For<INotifier>();
    _logger = Substitute.For<ILogger>();
 
    _service = new NotificationService(_userRepository, _notifier, _logger);
 
    _userRepository
        .GetById(Arg.Is<int>(i => i < 10))
        .Returns(new User { HasActivatedNotification = true });
    _userRepository
        .GetById(Arg.Is<int>(i => i >= 10))
        .Returns(new User { HasActivatedNotification = false });
    _userRepository
        .GetById(Arg.Is<int>(i => i < 0))
        .Returns(user => { throw new InvalidUserIdException(); });
}
 
[Fact(DisplayName = "NotifyUser calls logger when an exception is thrown")]
public void Call_Logger_When_An_Exception_Is_Thrown()
{
    _service.NotifyUser(-1);
    _logger.Received().Error("Given user ID is invalid");
}

The service is now covered with tests thanks to the use of NSubstitute.

Green-Tests

This library offers more functionalities, you can find them on the documentation page of the project website.

As for me, I only discovered this library recently, I am more used to Moq. But I must say that I like the API offered by NSubstitute, I find it more “fluent”. I think it can be really helpful when doing Test Driven Development (TDD). I will definitely give it a shot for future projects.

Choosing a mocking library is important in order to write tests easily when using dependency injection and there is a lot of choice for this, Moq and NSubstitute are some of them. And you? What is your favorite library for mocking? What does it offer that others don’t have?

See you next time!

NCrafts 2015 – EventStorming Workshop

sticky-notesEarlier this year, in may, I attended a 2 days conference about software craftsmanship in Paris: NCrafts. I also been able to attend a one day workshop about EventStorming.

This workshop was hosted by Alberto Brandolini and Mathias Verraes. Alberto is the founder of the Italian Domain-Driven Design (DDD) community, he runs Avanscoperta, a training company in Italy where he is a consultant as well. You can also encounter him as a speaker in various conferences across Europe. He is the one that came with the word “EventStorming”.

Mathias is an independent Belgian consultant focusing on software practices, on dealing with legacy systems and especially on DDD. Like Alberto you can meet him during conferences or during workshops, there is a list of all of his incoming ones on his personal website.

So you probably guess that EventStorming is about Domain-Driven Design and how to model it. I did this workshop because I consider that as professional software developers we have to understand the domain we work on in order to create the best possible applications.

Prerequisites

To practice EventStorming you need space on a wall, a lot of space. You also need sticky notes, a lot of them with different colors. You have to bring markers for everybody as well, the rule is at least one per person. Remove the tables and the chairs to be able to move freely in front of the wall.

Once the room is ready you need people with questions (the developers) and people with answers (domain experts, business analysts) in order to model the domain of the application.

An events driven approach

Everyone is ready, they have sticky notes and a marker, time to ask the first question: What is the most important event in the system? (from a domain point of view). In other words: what is the goal of the entire application? If the team works on a project without knowing what the main goal is, they will probably end-up with a “not so good” product.

Once you know the Event, write it on a sticky note (orange one) and put it on the wall. Most of the time the event are written using participle past phrases (InvoicePaid, UserRegistered, …). Now it’s time to model around this main event by turning back time: What is the event that occurred before? And before that?

The goal is to find the entire event chain that leads to the main event, this will give you a good idea of what is happening in the system from a business perspective. You will create something like the following picture (this is just a small example):

events-chain

If you are not sure about the necessity of an event, you can ask the domain experts if they care about the event or not, they know if it is relevant or not. For instance a “ButtonClicked” event is probably not relevant from a business point of view, except if the domain you work for is about buttons being clicked. Focus only on domain events, not on technical ones.

Linking the events

Now you have your events chain, the work is far from over, you need to add the “links” between them. An application cannot just be a succession of events. What happened between an event and the one before? What kind of action is required? For example, what happened between “InvoiceSent” and “InvoicePaid”? The client has to pay the invoice!

This last sentence looks obvious but it contains two important components for the EventStorming approach. The first one is the Command: “pay the invoice”, this is the action that has to be done. Time to change the color of your sticky notes, take a blue and write the command on it (Pay invoice) and put it between the two events.

Sometimes when you think of the command needed for an event to occur you might discover that there are more events in the system than you initially thought about or some are missing. If so add them on the wall where they belong, you can add new events at any time.

In “the client has to pay the invoice” there is another valuable information: the Actor, the person/system that acts on the application and launch the command. In this case the client is the actor, put a yellow sticky with the note “Client” on the command post-it.

Now you have a more detailed version of the domain, something like on the following picture.

eventstorming-event-command-user

One last thing regarding the commands, their execution can produce several events, it is not something to avoid, it all depends on your business domain.

And actors can be external to the system, in this case you can use a different color of post-it (pink) in order to identify them quickly.

Adding more information

Producing an event is the work of a command, yet the output of a command is not necessarily always the same, it depends on the Business Rules. For example, given a scenario where a user wants to log in, the expected event is UserLoggedIn. But what should happen if the username and the password are incorrect? We definitely don’t want the user to be logged in the application, in this case the “Log in” command has the following business rule: username is known and password is correct for the given username.

The business rules can be written on another kind of sticky notes (big and yellow) when the rules are quite specific, not like in the example I gave. Otherwise you will pollute the wall with irrelevant post-its containing obvious information.

To apply the business rules, a command needs information to know what it should do. In the log-in example this information is the username and the password. It is called the Message and it holds the data for the system.

Use a post-it (green) to list the data needed by the command and put it beside the related business rule/command couple. This way you are able to see where are the commands with complex business rules and what are the data needed.

After all of this you will have something like this:

full-eventstorming

As you can see, you really need a lot of space and you quickly locate every type of notes. And on this picture the entire model was not complete even after an entire day.

Do not be frightened by the time it took, you are not forced to model the entire application in a row, do it step by step, start with a single sub-domain. You will add the others during the next EventStorming sessions using the base you have already created.

Conclusion

I really enjoyed this workshop, I liked the collaborative approach of the EventStorming, everyone can be involved. It gives a very good representation of the business domain, what it should do and how.

Since the exercise is done with domain experts they use domain terms and therefore you are able to extract the ubiquitous language from the EventStorming session.

The format also favors story telling which are very helpful to gain knowledge of the business domain (“Most of the time it works that way but on rare occasion it works differently like this time when…”).

To summarize: An Event is the result of a Command, triggered by an Actor, following a set of Business Rules using the data of a Message.

A big thanks to Alberto and Mathias for making this workshop an awesome experience, do not hesitate to check their works on the topic, there is plenty of information they can teach you about EventStorming.

See you next time!

And here are some more pictures.

This slideshow requires JavaScript.

Extreme Programming: Sustainable Pace

Team-runningAs professional developers we work iteration after iteration on our project. Some projects are longer than others and it is likely that when one ends a new one begins. Therefore it is important for the programmers to preserve their energy level week after week.

When a developer is tired, his focus is dropping and it is likely that he will do more mistakes than usual and the quality of the development will decrease.

A marathon made of sprints

Finding the pace for a development team is hard because it should move as fast as possible but without getting tired in the long run, in a way it is like a marathon.

Yet at a lower level it can be seen as a sequence of small sprints with resting periods between each of them. With this technic the developers are able to work hard with a good level of focus on their task without losing their energy on the long run. This only work if the resting period are respected.

The pomodoro technique is based on this approach, where you work on a dedicated task for about 25 minutes, then take a 3-5 minutes break before starting a new “sprint” of 25 minutes, and after 4 pomodori take a longer break (from 15 to 30 minutes).

That’s a lot of breaks! Yes it is, yet these breaks are mandatory if you want the programmers to replenish their energy level. Because during the 25 minutes pomodoro they stayed highly focused on their task and it is a demanding exercise regarding mental stamina.

Managing overtime

With the practice of Extreme Programming (XP) it is advisable not to work over 40 hours a week, beyond this point it is likely that the pace will slowly decrease over time.

But sometimes working on a project requires some overtime in order to reach a given milestone, it is acceptable only if it is unusual. And if during a week the team is working extra time for the project, they cannot repeat this abnormal experience the week after.

In order to save the energy level of the team members and, by extension, their pace, the resting periods have to be respected. Otherwise it is likely that the developers will lose their focus over time and the product they work on will suffer.

Developing software is a mentally exhausting activity, it requires a lot of focus in order to get things done the right way. Refilling the batteries is essential to avoid any burn-outs among the team. You can use the pomodoro technique to switch between “energized work” periods and resting periods, this will allow you to take care of your tasks with a good pace without losing all your energy.

See you next time!

Extreme Programming: Continuous Integration

red-green-refactor-commitAs professional developers, we want to get feedback as soon as possible in order to detect any potential issues in our software. To do so we can practice Test Driven Development (TDD) to make sure that our code is fully tested. We also have a full acceptance tests suit that prevent us to have any regression regarding existing features.

Yet this might not be enough to ensure the quality of the software we build. It is likely that you work in a team with more than one pair of programmers.

Conflicts and merges

Now imagine that two pairs work on different user stories, each duo practice TDD to ensure the quality of their developments. After a day or two both teams are done, all tests are green and the acceptance tests still passed, time to commit/check-in the code to the source control.

But unfortunately both pairs updated a common part of the project, the first team will commit their changes without any issue. But the second team will have to deal with a lot of conflicts and merges before being able to save their work on the source control.

Maybe you haven’t experienced situations like this one before but if you do, you probably know the pain it can be to merge a project full of conflicts, it can take hours…

Avoid Big-Bang commit

Conflicts and manual merges occurred, there is always a time when several developers work on the same part of a project. But it is possible to ease this process in order to avoid such situation.

You need to integrate your changes often, do not wait the end of the day to commit your code. It is preferable if the commits occurred every few hours or even sooner. This way the conflicts you might have will be way easier to solve.

Whenever you want to integrate your code to the source control you have to make sure you have the latest version on your machine in order to check if all tests (acceptance ones included) pass otherwise you need to fix them before proceeding to the commit.

With modern tools at our disposal it is possible to automate the continuous integration process. You commit your changes, then the source control build the application and run all tests. If it is green, the project is deployed (most likely on a development environment) otherwise the code changes are refused and you need to fix the issues before trying again.

Extreme Programming is mainly focused on getting quick feedbacks, with unit tests for the code, acceptance tests for the business requirements. Continuous integration has the same goal of shortening this feedback loop, this practice helps a team to avoid Big-Bang commits with massive breaking changes that lead to compatibility problems, huge conflicts and painful merges sessions.

See you next time!


Image credits:

http://ardalis.com/rgrc-is-the-new-red-green-refactor-for-test-first-development

Extreme Programming: Collective Ownership

Team

As professional developers it is likely we have to work in a team with other developers. Even if it might happen that each team member has its speciality, it is important to share the knowledge using collective ownership.

Using this practice, every member of the team is encouraged to contribute to all parts of the project, each developer is responsible for the entire product and not only a part of it.

Collective code ownership

Each programmer can modify every line of the code base in order to fix a bug or to refactor in order to make the code cleaner.

Changes do not have to be done by a senior developer, a team leader or an architect, there is no bottleneck when an update is needed. Yet, this not mean that the younger developers should not ask for advises before making the change.

If everybody can change the code, how to prevent introduction of new bugs or regression? This is a commendable concern and it should concern you, short answer: tests!

Extreme Programming (XP) promotes the creation of acceptance tests, and also Test Driven Development (TDD), then it is likely that you have an entire test suit to help you avoiding mistake when changing code.

Pair programming sessions are also very helpful to discover how the system behave in its different modules, the knowledge of the application code base is shared.

Toward a self-organized team

When the code base is shared so is the responsibility for the well-being of the project. Every developer has the ability to improve the modules composing the application, to fix the bugs, to improve the overall quality of the project. The whole team is responsible for the success of the project.

In a team with only specialists, developers only responsible for their scope, you might have an organization like the one below.

hierarchy

Each team member has its speciality and keep it for himself and does not interfere in the speciality of his teammates, only the lead developer might have a vision of every aspect of the projet.

Now imagine that one of the specialist leaves. Do you ask the lead to take his place since he is the only one who know what this member was working on? You can hire a new specialist to take his place but this person will to be ready for the job right away.

By practicing collective ownership, you can end up with an organization like the following.

share-knowledge

The knowledge is shared among all team members and everyone is able to work on each speciality. If one of the developer leaves the project, the rest of the team is able to take care of its work while training the newcomer.

“But as a specialist, I am essential to the team and I will not be fired. In a collective ownership team I am expendable”. Well if you live in the fear of being fired and then you try to protect your scope as much as possible, you might ending up protecting you too much and falling into a blame culture environment. And I think that nobody is irreplaceable, sure your team will struggle to replace your skills but they will with time.

On the other hand, in a team where knowledge is shared, the developers works closely to each other and they build trust. In my opinion it is more likely that this team will become more and more efficient over time. And it will be silly to break this harmony by firing someone.

These two team organizations remember me of the “Notes to a software team leader” book. One looks more of a command & control type of environment and the other one more of a self-organized team environment.

Collective ownership helps a team to share knowledge, both technical and functional, between the developers. Every member is able to impact each module of the project for bug fixing, refactoring and improving the product. The team becomes a whole and is no longer a collection of individuals.

In order to practice collective code ownership it is important to also share other practices such as TDD, acceptance testing and especially pair-programming.

See you next time!

NCrafts 2015

ncrafts-logoThis week I had the chance to attend the second edition of the NCrafts conference. This conference takes place in Paris and had a lot of awesome speakers from all over Europe.

If you don’t how what this conference is about, have a look at the manifesto below, it will give you an idea.

It’s about programming but also about experience and feedback

It’s not only about technologies but also about practices

It’s not only about software craftsmanship but also about learning and exchanges for everyone

It’s not only about business and applications but mainly about people

In other words, it’s a software conference for developers by developers. We love crafting software with art, passion and technology and share it with everyone.

This manifesto reflects my philosophy and what I try to show in my blog posts. And this exactly what happened during the conference, the speakers and the attendees where very open-minded and we were able to discover new practices.

The Workshops

The day before the conference some workshops were organized by several speakers and I chose to go to the “Event Storming” workshop hosted by Alberto Brandolini and Mathias Verraes.

I will not get into the details of this workshop since I intend to write a full blog post about this experience.

To summarize, the “Event Storming” is an interactive practice that aims to bring the domain experts and the developers closer to each others. You need space on a wall, a lot of space, sticky notes and markers to use this practice.

The goal of this workout is to model the process based on domain events. At the end the developers should have a good idea of how the system should behave and what are the business rules to implement.

DDD, TDD & Functional programming

The conference lasted two days with two talks tracks for each day, there was a lot of awesome content in each talks, a lot of food for thoughts.

Domain Driven Design (DDD) was part of this conference and it makes sense since I believe that, as professional developers, we cannot produce valuable software for our clients without knowing their domain.

Functional programming had also an important place in the conference, it was almost possible to attend only functional programming talks. Most of these talks were made using the FSharp (F#) language.

I made a small introduction to this language a few months ago and being able to see F# developers from the community sharing their tips, tricks and technic was really enjoyable.

I think that functional programming will help us solve some problems we encounter in our everyday job faster than object-oriented programming. It is not better or worse, yet some paradigms of the functional approach are really attractive.

Testing had also a place in the conference for both functional programming and object-oriented programming. If you read my blog you should now know that I write quite a lot about tests, it is a topic I really care about.

During the conference I discovered new approaches for Test Driven Development (TDD) and explanation on the difficulty to practice it. The Type Driven Development (TDD again) practice for F# was really interesting in order to design software.

Waiting for NCrafts 2016

I did not attend last year edition of NCrafts but I will definitely try to go again next year. It was 3 amazing days with a lot of great and open-minded speakers. The NCrafts team did a really great job to make the experience as smooth as possible and as enjoyable as possible.

It gave me a lot of ideas to share with my team in order to improve our technical skills, practices and processes. I can only highly recommend you to watch the talks online when they will be available.

See you next time!

Extreme Programming: Test Driven Development

Red Green RefactorAs professional developers our role is to produce high quality software for our clients. To achieve this goal we must make sure that our application meets the requirements defined by the business analysts and works as expected, without side effects.

To achieve this, you should rely on a full automated tests suite. And to make sure that this tests collection is complete and cover all your code base you can practice Test Driven Development (TDD).

TDD relies on repeating a short development cycle where tests are writing before production code. This process can be defined by the 3 following rules.

  1. Don’t write any production code until you have written a failing unit test.
  2. Don’t write more of a unit test than is sufficient to fail or fail to compile.
  3. Don’t write any more production code than is sufficient to pass the failing test.

Thinking ahead

By following these rules you can implement the required needs step by step. And by writing the tests first you also have to think from a caller perspective, you are a client of your own code.

With this paradigm shift, you have to think of what is actually needed in order to complete the case you are working on and nothing more. It is helpful to avoid any unnecessary over-engineering phase that might happen in the early development phase. This way you can follow the YAGNI (You Aren’t Gonna Need It) and the KISS (Keep It Simple, Stupid) principles, you only code what you need, nothing more.

Immediate feedback

TDD makes you write your tests suite at the same time as your production code. This allows you to be able to refactor the code easily, and you will do refactoring all along the way.

Refactoring is even one of the 3 phases of TDD: Red, Green, Refactor. You start by writing a failing test (Red), you write code to make it pass (Green) and you refactor the code to make it cleaner (Refactor). And of course you make sure that the tests still passed after the refactoring before writing a new failing test.

By practicing TDD, you consistently work with a safety net, if something is broken you know it right away!

Leading to better design

The TDD approach forces you to write testable software, therefore it is likely that the code will be less coupled than if it was written straight away without tests first.

A less coupled application is easier to maintain and easier to extend with new behaviors. This way you can improve your code base by adding advanced programming patterns during refactoring phases when you actually need them.

Due to this fact, TDD is sometimes decomposed as Test Driven Design instead of Test Driven Development. Yet to achieve better design when using TDD it is important to know programming patterns and programming principles (e.g. SOLID in oriented object programming).

Living documentation

One of the benefit of having a full tests suite for your production code is that it can work as documentation for it. By browsing the tests of your APIs the caller knows how to use it, how to instantiate the classes and what the expected outputs are for the available methods.

And this kind of documentation is always up to date since it is bound to the associated code it tests, if the code is updated so are the tests otherwise it fails.

More about TDD to come

When writing these lines I am still new to TDD and to be honest I don’t practice it every time, especially when working on legacy project (which would not have become legacy if developed with TDD or proper code coverage at least…). But I strive to follow the TDD rules when adding new behaviors to an existing project covered with tests.

I really want to learn more about this practice and this is why I work on increasing my TDD skills with some side projects. I will share the experience gained from these projects in a near future on this blog.

At the moment I am convinced that using TDD is very helpful to produce high quality software in a concise way. It helps me thinking of the exact behavior I want/need for my program. I like the fact it gives instant feedback and allow constant refactoring without having the fear of breaking anything.

See you next time!

Extreme Programming: Pair Programming

pair-programmingAs professional programmers, our goal is to produce high quality software for our customers. Pair programming is a helpful technic that allow to reach this goal.

Developers do pair programming when they sit in front of the same computer to complete tasks for a new user story. To me it is a different job than pair debugging, where you work on existing code in order to fix it, in pair programming you create new functionalities for your application.

At first it can be seen as a waste of time since two team members work on the same machine and it might look that the capacity for these programmers is divided by two.

I do not share this opinion, to me pair programming is a very good way to improve efficiency when working on a new feature.

Staying focused

When you are two it is likely than there will be always one of the two developers that knows what should be done next. It is helpful when one in the pair starts to feel a bit tired, the other one can continue and you rotate regularly. This will prevent any loss of total focus during the development phase, but the pair should still do some breaks from time to time.

When one of the programmer is coding the other one looks at the written code and can detect mistakes early on, it is an effective live debugging technic.

Share knowledge

When a pair of programmers works on the same user story together they will share the knowledge of the implementation. They will both know how it has been developed, this way your team is no longer dependant on a single developer for knowledge of a specific feature.

Beside technical knowledge you can also gain a better understanding of the business knowledge related to the user story you are working on. For instance instead of having a developer working on the front office workflow (from a business perspective) and the other one on the back office one, both developers can pair-program on the two subjects to understand how the system should behave on the front side and on the back side.

The code is also written by several persons and therefore there is no code ownership, this will avoid situation like “do not touch my code!” or “I won’t touch code”. The code is owned by at least the two programmers forming the pair, a step toward egoless programming.

Share skills

Pair programming sessions are also good to learn new practices, tips and tricks. When working in pair you can simply discover a new shortcut for your favorite IDE you were not aware of.

And most of all pair programming can help you discover new skills and practice them. For example you can improve your Test Driven Development (TDD) technic when working with a pair that is more experienced than you are. During a pair-programming session, we (my teammate and I) developed an entire topic using TDD, one wrote a failing test and the other one had to make it pass and then write a failing test and so on. This was a very rewarding experience, we were both new to this yet we practiced together and improved our knowledge.

Pair-programming is a social activity, it takes time to learn and can be frustrated from time to time. Yet it is very helpful to share knowledge amongst your team, you can always learn something new from one of your peer.

This practice can seem like a waste of time but since the pair is always focused on the topic, it can go faster with a higher level of quality. You can find a study about costs and benefits of pair-programming here.

See you next time!

Extreme Programming: Acceptance Tests

Check ListIn the chapter about user stories, I explained that they should not contain every details for the feature. Yet the development team needs these details in order to provide value. The details are discussed between the whole team members and you write them down using acceptance tests.

An acceptance test represent a specific scenario for the given user story. They are written by the business analysts and the testers. The developers take no part in the writing since these tests are business focused and are not technical at all.

The acceptance tests are written during the development phase of the user story, this is mandatory since they must passed in order to validate the entire user story.

These tests must be kept and run each time a new build of the application is made. Because working on a new user story can have impacts on previous ones and you want to make sure that they are not broken. Therefore you should find a tool that allow you to run your whole acceptance tests suite automatically.

A common language

Earlier I said that the acceptance tests are written by non-technical people. This allow you to make them understandable by everyone, your whole team is able to read them.

To do so, you can use the gherkin language which has been created to answer this problematic. This language uses a Given-When-Then structure to define the steps of a scenario.

Let’s see an example with the following basic user story:

As a visitor, I want to login, in order to access the website.

I will now create two different acceptance tests with the gherkin syntax for this user story.

Given a visitor,
When I log in with an existing account,
Then I am able to access the website
Given a visitor,
When I log in with an undefined account,
Then I am not able to access the website

With these scenarios I get more details for the expected behavior of the application regarding the user story to develop. You can use acceptance tests to test incorrect behaviors.

One of the benefit of the gherkin language is that you can use it with several testing framework to automate your tests suite and then you can run them automatically. You can use Cucumber to do so, or Specflow with .NET, this will bring your acceptance tests to a whole new level.

Acceptance tests as proofs

Acceptance tests allow the team to prove that the user story is working as expected. You have a list of scenarios defining the behavior of the feature. And by using an automated tool, you can detect any regression quickly.

These tests are bound to the code written by the development team and therefore are up to date. If the code of the application is updated so are the tests or else it is likely they will no longer pass.

Acceptance tests as documentation

The other benefit I like about acceptance tests is the fact that they can provide documentation for the application. Every members of the team are able to read them to gain understanding of the expected behavior, very helpful for newcomers.

And since it is written by the business analysts, it uses the correct terms for the business domain. This should help the whole team to communicate by using the same vocabulary. It’s a step toward the use of an ubiquitous language for a Domain-driven design (DDD) approach.

Acceptance tests are complementary with the unit tests, they provide a good understanding of a feature and are readable by everyone. They bring the business analysts and the developers closer to each others by providing them a share ground. Using acceptance tests require a good collaboration in your whole team.

In my opinion having them is a big plus to avoid regression, like all automated tests they provide a good safety net for future developments.

See you next time!