Several months ago I wrote an article to share my experience of a web developer moving to the world of mobile applications development. I am working in this field using the Xamarin technology. And you might have heard that Microsoft just acquired Xamarin, but I will not speak about this topic in this blog post, I do not have any opinion at the moment regarding this news.
When I introduce myself as a Xamarin developer, I often have to explain what it means even to other developers. And this is why I am creating this blog post, to introduce not only the technology but also the entire platform.
The technology
“Oh, I see, it’s like Cordova” is an answer I get from time to time, which is a start. Well, if you imply that Xamarin helps building cross-platform mobile applications, it is correct, but it is not really “like” Cordova.
What I like with Xamarin is the fact that it allows me to create native applications like an Android or iOS developer would do. The only difference is that I do not use the same programming language, instead of Java/Kotlin or Objective-C/Swift, I use C#. Like an Android developer I deal with activities, fragments, intents, AXML files and like an iOS developer I use storyboards, view controllers, UIView controls…
So, if the only difference is the programming language, what is the advantage of using Xamarin? Well, if you develop a mobile application on only one platform it might not be very interesting to use it except if you only know C#. But if you create an application on several platforms, it becomes relevant, because you can share code between Android, iOS and Windows Phone for instance. All of your apps use the same programming language. For example you can create a library with a API client for you application and use it on Android, iOS and Windows Phone: write it once and use it three times.
It is also possible to use Xamarin.Forms to share code between the User Interface (UI) for the three platforms I previously mentioned. But I will not go into the details because I have not used this technology at the moment. I can only tell you that it used a similar XAML format than the one available on the Windows platform.
The tools
“But how do I write C# with Xcode?” You cannot, to develop mobile applications with C#, Xamarin provides an Integrated Development Environment (IDE) called Xamarin Studio which is available on Mac OS and Windows. You can also use a Visual Studio plugin to create Android and iOS apps from Windows, but keep in mind that you will still need a Mac for iPhone/iPad to be able to build and for the simulator.
Xamarin also provides their own Android simulator to test and debug android applications: the Xamarin Android Player, which is pretty good and available on Windows and Mac.
You can also monitor your applications with the Xamarin Profiler (still in preview at the moment) in order to track the memory allocations and to find potential memory leaks. It also allows to track time and to find bottlenecks. I used it to review the memory usage of an existing application and I was able to detect several anomalies easily, it is a very helpful tool.
The services
Xamarin not only provide tools to help us developing cross-platform applications, it also offers several services to improve the overall experience. Learning mobile apps development can be overwhelming at first, especially when you try to learn several platforms at the same time. The Xamarin University aims to help you in this matter, but it clearly targets organization and not individuals (it is expensive).
Xamarin also offers a cloud platform in order to test your applications on a lot of different devices: Xamarin Test Cloud. You can access more smartphones configurations than you will ever be able to get, you will be able to detect issues related to a specific OS version.
Once your applications is released you might want to monitor what is going on, is it stable? What are the errors my clients encountered? What the users do with the application? To answer these questions you can use the Xamarin Insights services. It will give you access to a dashboard allowing you to see a lot of useful information for your applications. But you will have to use the SDK and “plug it” inside your code base. So you have to plan it before your release if you want to use it, it is not something you just activate afterward.
Here is my introduction of the Xamarin platforms, I hope this helps you to gain a better understanding of what is Xamarin and what are the tools and services available with it. Xamarin is not just a technology it is also an entire ecosystem available to the developers who want to create native applications. You also have to keep in mind that some of these products might change in the future depending on the strategy of Microsoft for the entire Xamarin platform.
In my last AkkaOfEmpires blog post, I started to use dependency injection (DI) for my various actors, but it was made “by hand”. So today I will show how to do it with Akka.DI, which is a plugin bringing DI to Akka.NET.
My goal is to be able to ask the actor system for VillagerActor instances without having to specify their dependencies, I’ll let Akka.DI handle this job.
Here is the VillagerActor constructor having the dependencies:
Now I will change this last part in order to use dependency injection. First there is a nuget to install, in my case I will use StructureMap for the Inversion of Control (IoC) container.
Install-Package Akka.DI.StructureMap
Now, if you want to use another one you can see the list of available Akka.DI extensions here.
First I will rework the SubroutinesFactory by extracting an interface.
Like before, I have two factories: a “classic” one and another one for the Console GUI. I will use the latter in my DI configuration.
Akka.DI uses a dependency resolver to link the IoC container with the actor system, there is one avaialble in the nuget package. I can now update the code:
I have specified that every instance of ISubroutinesFactory will be automatically resolved as ConsoleSubroutinesFactory instances and that is what will happen when requesting a new VillagerActor from the system.
I have taken care of one of the two dependencies for the actor. The other one is tricky because it is a IActorRef instance which can refer to every type of actor in the system.
The easy way
Well, at the moment the only IActorRef I need to inject through DI is for the ResourcesSupervisorActor, so I can have the following workaround:
I defined the dependency as a singleton because I want the resources supervisor to be the same for all the villagers. But now every classes that will need a IActorRef dependency will have a supervisor actor when constructed through DI.
With some IoC containers it is possible to play with named instance and conditions over the constructor parameters to provide the correct instance. But… meh… it is painful to set up and I think it can be dangerous. Let’s try something else.
Another way
What I can also do to fix my problem is removing the dependency to the IActorRef. Instead I will inject a service that will provide the reference to the supervisor actor, like I did for the subroutine actor.
Here is the end of my introduction to Akka.DI for Akka.NET. It allows the instantiation of actor references without having to declare all their dependencies every time a new actor is needed. Yet using DI with Akka.NET can become tricky when these dependencies are others IActorRef. At the moment I prefer avoiding them as much as possible.
Feel free to share your own experience with Akka.DI when it comes to IActorRef.
A few weeks ago I shared my experience of moving from web development to mobile development. In this article I mentioned asynchronous programming which is mandatory for desktop and mobile applications.
Today I will give you an example to demonstrate how to use the async-await pattern in order to avoid having a User Interface (UI) that freezes (does not respond to user interaction).
The synchronous approach
In this demo, I have created a simple WPF application with a button and a label, I will not use the Model-View-ViewModel (MVVM) pattern in this example. When clicking on the button some data will be retrieved on a repository and processed by a service before updating the label with the value.
I used the Thread.Sleep() method to mock latency, due to database/network access and calculation time.
From a syntax point of view the code compile and does what it needs to do. But when we launch this program, the UI will freeze for 10 seconds and will not respond to the user interactions. This clearly not the best experience for a software.
The application has this behavior because all the work is done on the UI thread and it won’t be able to do its main work: displaying and refreshing the UI (responding to the user inputs is part of it).
It is time to update the code to make the code asynchronous.
Using Async-Await
I refactored the previous code to be able to use the async and await keywords.
Great! It should be better this way, let’s try it… It still freeze for 10 seconds… Even with the async-await pattern!
That is normal, the program does not create a Task on a separate thread and therefore all the code is still executed on the UI thread. Only using the async/await keywords is not enough to make the code asynchronous. Some methods of the .NET framework will create tasks on separate thread to allow you to use this pattern, like the GetAsync() method of the HttpClient class (see more examples here). You can detect them by looking at the “Async” suffix in the method name, it is a convention to use this suffix to notify calling code that the method is “awaitable”.
In my case I will fix my problem by creating a new Task with the Task.Run() method:
This gives me a Task I can use in my class hierarchy to run the code asynchronously. Now if we run the program it is better but the UI will still freeze for about 5 seconds…
This is caused by the ComputeData() method in the DomainService class which is executed on the UI thread. Well, I can use another Task.Run() to solve this problem. True but I can also use another feature of the Task to solve my issue: Task.ConfigureAwait():
// DomainService.cspublic async Task<string> GetDataAsync(){var data = await _dataRepository.RetrieveDataAsync().ConfigureAwait(false);
data = ComputeData(data);return data;}
The parameter of the ConfigureAwait method (named “continueOnCaptureContext”) allows us to specify if we want that the rest of the method to executed on the captured context or not. This refers to the calling thread which is the UI thread in my case. By default this value is set to true and that means that the ComputeData() method was executed on the UI thread which explains why the application froze.
Now, if we run the application, the label will still be updated after 10 seconds but the Window will be responding to the user interactions which is, in my opinion way better for the user experience.
This ConfigureAwait tip looks great, let me use it on the button_Click() method!
But when I run the program, I have the following result:
I have an InvalidOperationException with the following message: “The calling thread cannot access this object because a different thread owns it”, displayed in a message box (in French in my case due to my configuration).
This error happens because I try to access the label property of the MainWindow from a thread different from the UI one. This is caused by the ConfigureAwait(false) I put, in this case I don’t want it because the code needs to be executed on the captured context.
Conclusion
Working with the async/await pattern needs practice to be understood, I wrote this article to explains some concepts of it by showing its impacts on a UI interface. I do not claim to be an expert on the subject, there is a lot more I need to learn on this topic. But remember that you need a Task to work with to unlock the potential of this pattern.
The Task.ConfigureAwait() method is also a powerful ally to lighten the work done by the UI thread but it needs to be used carefully to avoid invalid operations in the application.
The async keywork can only be used on methods returning a Task, a Task<T>, or void. This last case can be dangerous and should be avoided as much as possible, in my case the only async void method is the button_click event handler. I took care of encapsulating the whole code in a try/catch block and every time you see an async void method you should do it as well. Because it behaves as a “fire and forget” call and if you do not handle the exceptions in the method, they will be raise later without knowing exactly when or where and it will likely stop the process and the application.
I hope this example can help you if you are starting with asynchronous programming in C# .NET.
In my last AkkaOfEmpires blog entry I started a Graphic User Interface (GUI), only on console mode, to display how the actors in my system behave. In this project I use the Akka.NET framework (implementation of the actor model) to re-create some of the rules present in Age of Empires II.
I was able to add a “console” implementation for two actors on the three I currently have in the system. This last actor is harder to “override” because its creation is done by another actor. Here is the code I am talking about (inside the VillagerActor):
var props = Props.Create<ResourceHarvesterActor>(Context.System.Scheduler, Self);var resourceHarvesterRoutine = Context.ActorOf(props);
An I would like to use the following implementation of the ResourceHarvesterActor.
But, as I said in my last article, I cannot directly use this class in the VillagerActor, because it would create a circular reference and I don’t want to have “GUI” classes in my “core” project.
I think this issue shows that there is some coupling in the VillagerActor, indeed the class directly use the Props API and the Context. I believe it would be a good thing to extract this part of the code and encapsulate it in a dependency.
An actor factory
To fix this issue I will create a factory which will deal with the creation of the subroutine for the other actors and I will be able to use this class as a dependency for the VillagerActor. This way I will remove some coupling in the code.
The method in this factory needs some parameters to do its job, first an actor context in order to access the Scheduler and to create the IActorRef instance, secondly the IActorRef for the VillagerActor needing the subroutine.
Now, the good thing is that I can create another implementation for this factory in my Console GUI project to use the ConsoleResourceHarvesterActor instead of the regular ResourceHarvesterActor.
(To avoid too much flooding on the console I put only one villager instead of three).
And when launching the application, we can see the following output, letting us know what is happening.
We now have what we wanted, information is displayed for each actor and we have a pretty good idea of what is going on. The overall behavior looks good.
In this post I showed a way to extract the logic of creating an actor in a dependency in order to override the behavior, you can find the entire solution here.
For the moment my project is quite small and I only have two levels in my class hierarchy, therefore this “factory” fix will be hard to continue in the future because I have to inject the dependencies at the “boundaries” (the Main() method in my case). In the next AkkaOfEmpires post I will introduce Dependency Injection (DI) when working with Akka.NET to remove this future problem.
Today, I will continue my journey with my project named AkkaOfEmpires. In this project I implement some of the rules of the game Age Of Empires II using the actor model with Akka.NET. You can find the last entries about the project here and here.
In this blog post I will not add new functionalities related to the game, first I feel the need to change a few things I made. I want to change the communication between the VillagerActor and the ResourceHarvesterActor routine. See the code for these two classes below.
What I don’t like with this code is the fact that the “routine” sends the message to the resources supervisor directly. In my opinion the routine should notify the VillagerActor when the capacity is reached and then stops its process.
For me this child actor should not be aware of any actor except itself and its parent. The higher level actor will take care of the communication with the supervisor.
Akka.NET does not provide any shortcut to send messages to the parent of an actor, therefore we will have to inject the reference. We already have a parameter in the constructor of type IActorRef, for the supervisor, from now it will be a reference to the VillagerActor. The type does not change but the actor at the other side of this reference will, then it is extremely important to use proper names when manipulating IActorRef references.
I now need to refactor the case when the maximum capacity is reached. The villagerActor will be notify and will behave accordingly and the routine will be stopped.
To do this, I created a new message type names MaxCapacityReached with the amount of resource gathered. And to stop the actor I use the Stop() method of the Context property with Self as argument. By doing so the actor system will stop the current instance of the actor.
Now I need to update the behavior of the VillagerActor to properly use the ResourceGathererActor.
I moved the creation of the child actor (the usage of Props and Context) inside the method (it was in the constructor before), because now the routine actor will stop once its job is done. If this is not done, the program will not crash, instead the message will not be delivered and will become a “dead letter” (more information on JVM Akka website here). Note that I also save the received command in a field, which will be used shortly.
Now this VillagerActor also need a new handler for MaxCapacityReached message in order to “return to a depot” to increase the amount of resources available.
Once the message has been sent to the ResourceSupervisorActor the VillagerActor will send itself the command it previously stored, this way it will continue its job by creating a new child actor (a routine) to gather resources.
Now the question is: Does that really work as expected? I could try to make some tests to cover these cases but I fear that they will be extremely difficult to write. Instead I think it is time for me to create the first GUI for the project. Do not get too excited, I will simply be a Console GUI…
The Console GUI
To display the behaviors of the actors, I could simply add some Console.WriteLine() in the methods but I don’t want to pollute the code of my actors with this. Instead I will use inheritance to add this behavior.
To be able to do this, I have to change a few private methods and make them protected virtual (see in the code samples above). And I can now define some ConsoleActors in a new project (AkkaOfEmpires.ConsoleUI).
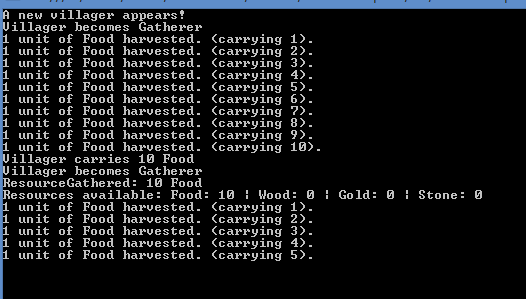
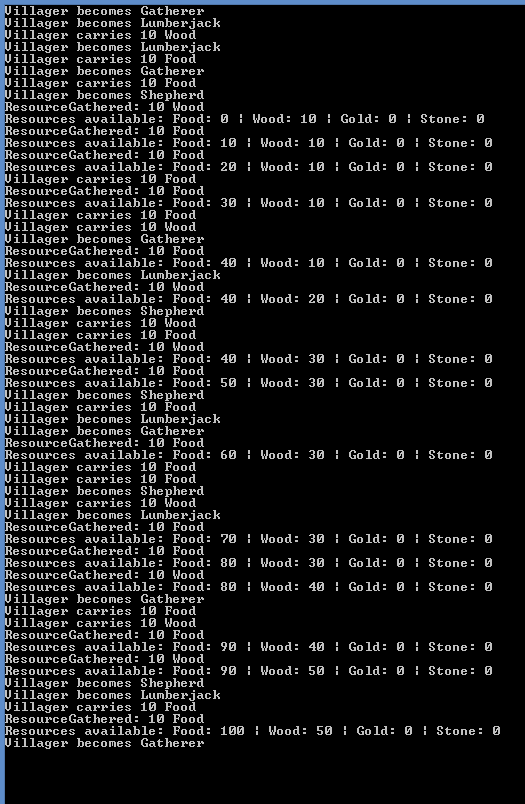
This program will create the resources supervisor actor and 3 villagers, the first will become a gatherer, the second a shepherd and the last a lumberjack. Now if we launched this program we have the following ouput (after about 50 seconds).
Looks good, the food and wood amounts increase over time, these villagers are now efficient workers!
But… What about a ConsoleResourceHarvesterActor? Well, this one is a bit different, its creation is directly inside the VillagerActor and not in the program. I cannot used this specific actor in the code of the VillagerActor (Circular reference between AkkaOfEmpires and AkkaOfEmpires.ConsoleUI) and I do not want to, a UI class has nothing to do in my core project.
The resolution of this “issue” will be in my next AkkaOfEmpires blog post. Meanwhile you can take a look at the entire solution on GitHub.
Several months ago I introduced the concept of mocking dependencies of a class in order to ease the writing of tests for it. I also introduced the Moq library which is a mocking library and today I will introduced another one: NSubstitute. This project is open source and you can find it on GitHub.
I will not cover all the functionalities it offers, instead I will show you how it works with an example like I did with Moq. First you can install NSubstitute with Nuget:
Install-Package NSubstitute
What to test?
I have created the following service with a bit of logic to test.
This service relies on dependency injection to do its work, you’ll find these dependencies below.
publicinterface INotifier
{void Notify(User user);}publicinterface IUserRepository
{
User GetById(int userId);}publicinterface ILogger
{void Error(string message);}publicclass User
{publicbool HasActivatedNotification {get;set;}}publicclass InvalidUserIdException : Exception
{publicoverridestring Message
{get{return"Given user ID is invalid";}}}
Let’s test it!
I will now write tests to cover the logic hold by the NotificationService class using NSubstitute. I will also use xUnit as testing framework, you can find more information about this project here.
In order to test the service we will have to instantiate it, and therefore we will have to inject the dependencies. So the first question is: how to create mock (or substitute) with NSubstitute? As a reminder it is done like this with Moq:
There is no wrapper for the mock, we directly manipulate an instance of the interface we want to substitute. You might wonder how to use it as a mock if it has only the methods defined in the interface, I’ll come to that later.
We can now setup our test class for the service with all the dependencies.
For information, the test setup is done in the class constructor with xUnit.
We can now focus on writing the first test for the class: verifying that the repository is called when executing the NotifyUser method. To do so we will use some extension methods provided by NSubstitute (here is the answer to the previous question).
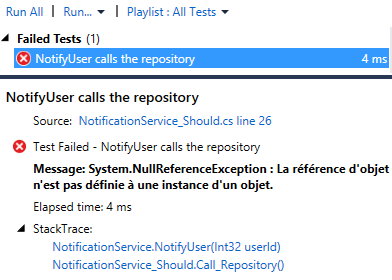
[Fact(DisplayName ="NotifyUser calls the repository")]publicvoid Call_Repository(){
_service.NotifyUser(Arg.Any<int>());
_userRepository.Received().GetById(Arg.Any<int>());}
The Received() extension method checks that the following method is called. Since we don’t have to test for a particular user ID, we can use the Arg.Any<T>() method to specify that any integer is valid (with Moq it is It.IsAny<T>()). We run the test and…
…it’s red? NullReferenceException… Of course! The mock repository does not return any instance of User and the execution fails after when trying to use the reference. Let’s fix this by configuring the substitute.
[Fact(DisplayName ="NotifyUser calls the repository")]publicvoid Call_Repository(){
_userRepository.GetById(Arg.Any<int>()).Returns(new User());
_service.NotifyUser(1);
_userRepository.Received().GetById(Arg.Any<int>());}
Now the test is green, but in this test we setup a mock and then we test that it has been called, in my opinion it is not very constructive. We should try to focus on testing something else, the rest of the method’s logic depends on a property of the User, let’s test this for instance.
public NotificationService_Should(){
_userRepository = Substitute.For<IUserRepository>();
_notifier = Substitute.For<INotifier>();
_logger = Substitute.For<ILogger>();
_service =new NotificationService(_userRepository, _notifier, _logger);
_userRepository
.GetById(Arg.Is<int>(i => i <10)).Returns(new User { HasActivatedNotification =true});
_userRepository
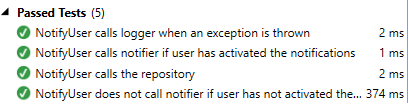
.GetById(Arg.Is<int>(i => i >=10)).Returns(new User { HasActivatedNotification =false});}[Fact(DisplayName ="NotifyUser calls notifier if user has activated the notifications")]publicvoid Call_Notifier_When_User_Has_Activated_Notification(){
_service.NotifyUser(1);
_notifier.Received().Notify(Arg.Any<User>());}[Fact(DisplayName ="NotifyUser does not call notifier if user has not activated the notifications")]publicvoid Does_Not_Call_Notifier_When_User_Has_Not_Activated_Notification(){
_service.NotifyUser(11);
_notifier.DidNotReceive().Notify(Arg.Any<User>());}
This time I used the Arg.Is<T>() method to add condition to the substitute, this way I can setup the result of a method depending on some conditions. Here I set the HasActivatedNotification property to true if the userId is inferior to 10 and to false otherwise.
And to test that a method is not called I use the DidNotReceive() extension method. Now I will write a test for the case when an exception is thrown by the repository to check that the logger is correctly called.
public NotificationService_Should(){
_userRepository = Substitute.For<IUserRepository>();
_notifier = Substitute.For<INotifier>();
_logger = Substitute.For<ILogger>();
_service =new NotificationService(_userRepository, _notifier, _logger);
_userRepository
.GetById(Arg.Is<int>(i => i <10)).Returns(new User { HasActivatedNotification =true});
_userRepository
.GetById(Arg.Is<int>(i => i >=10)).Returns(new User { HasActivatedNotification =false});
_userRepository
.GetById(Arg.Is<int>(i => i <0)).Returns(user =>{thrownew InvalidUserIdException();});}[Fact(DisplayName ="NotifyUser calls logger when an exception is thrown")]publicvoid Call_Logger_When_An_Exception_Is_Thrown(){
_service.NotifyUser(-1);
_logger.Received().Error("Given user ID is invalid");}
The service is now covered with tests thanks to the use of NSubstitute.
This library offers more functionalities, you can find them on the documentation page of the project website.
As for me, I only discovered this library recently, I am more used to Moq. But I must say that I like the API offered by NSubstitute, I find it more “fluent”. I think it can be really helpful when doing Test Driven Development (TDD). I will definitely give it a shot for future projects.
Choosing a mocking library is important in order to write tests easily when using dependency injection and there is a lot of choice for this, Moq and NSubstitute are some of them. And you? What is your favorite library for mocking? What does it offer that others don’t have?
Today I will continue to present my work on AkkaOfEmpires, in this project I implement some of the rules from the game Age Of Empires II using the actor model with Akka.NET. You can have a look at the first step here.
In this last entry I introduced the concept of behavior switching using Akka.NET while providing an implementation for a villager (unit in the game) gathering various types of resources. In this article I will continue to work on the VillagerActor and I will mostly do refactoring.
For the moment the villager has a dedicated method for all the professions he can have when gathering resource, see the class below.
As you can see the code is quite redundant and there is already a lot of methods for the class. Yet a villager can do a lot more than simply gathering resource and I fear that my class will become too big. When working with Object Oriented Programming (OOP) I try to follow the SOLID principles and I feel like I’m starting to break the Single Responsibility Principle.
My goal is to create a child actor for the VillagerActor to deal with all the resource gathering to avoid having too much logic inside this class. But first I will do some refactoring.
Refactoring phase
You may have noticed that all the commands related to the resource gathering are similar, they are associated to a type of resource and to a profession, it looks like a good opportunity to introduce an interface for all of these commands.
I can now update the implementation of the VillagerActor to use the properties available in the classes I just refactored to simplify it and to remove all the code duplication.
In my opinion this is way cleaner than before even if the notion of one method by profession has been removed, we still have a property for this.
Now I think that I have a good base to add the child actor which will have a bit more logic than this current implementation.
The child actor
In Age Of Empires II, gathering resource takes time, a villager harvests resource one by one and brings them back to the a resource depot when his capacity is full. I will implement this logic in the new child actor called ResourceHarvesterActor. This actor is not a unit on its own, it will represent a subroutine of the villager.
To simulate the game logic, this actor will send a message to itself every second to increment the amount of resource the villager is carrying. To do so I use the ITellScheduler interface which is available in Akka.NET. This allows to set a delay before sending a message to an actor, in this case the actor is itself so I use the Self property. I chose to use this interface instead of an implementation to be able to inject the dependency to ease the testability of the class.
I also added a condition to detect when the villager is at full capacity, when it occurs then the ResourceSupervisorActor is used to increment the global counter for the resource being harvested (in the game the villager goes to the depot for this).
There is another game rule I implemented in this actor, the fact that a villager cannot gather several types a resource at the same time. For example if a lumberjack is ordered to go fishing, then the wood he is carrying is lost. I made a unit test to cover this case:
[Fact(DisplayName ="ResourceHarvesterActor Should Empty CurrentlyCarrying If Different Resource To Harvest")]publicvoid Empty_CurrentlyCarrying_If_Different_Resource_To_Harvest(){
_harvester.Tell(VillagerOrders.CutTrees);
_harvester.Tell(new ResourceHarvesterActor.ResourceHarvested());
_harvester.UnderlyingActor.CurrentlyCarrying.ShouldBe<uint>(1);
_harvester.Tell(VillagerOrders.CatchFish);
_harvester.UnderlyingActor.CurrentlyCarrying.ShouldBe<uint>(0);}
Now I will use this new actor inside the VillagerActor.
There is nothing particular in here except the fact that I used the Scheduler from the System (available through the Context) for the child actor. With the refactoring and the adding of a child actor, the VillagerActor has more the role of a coordinator than an actor since I remove all the logic from it. But this is a temporary situation, since I still have a lot of rules to implement, with time it will become a high level actor delegating work to child actors.
The code for the entire solution is available on my GitHub repository, it will allow you to see the entire project. Since I write the blog posts in parallel of the development of the solution itself it is likely that the code will change a lot with time due to constant refactoring. So it is possible that the code shown in the articles is not up-to-date when you read it, therefore do not hesitate the browse the changes in the repository’s history and to have a look at the different branches.
I am quite interested by the actor model pattern and especially by using Akka.NET. So I wondered how I could learn it by practicing, the Petabridge’s boot camp is a very good start but I want to learn more by myself.
When I was a kid, I used to play a lot at Age Of Empires II: The Age of Kings, I played this game for hours and I still know a lot about the rules. This is a strategy game in real-time, where the player manage units to gather resources, expand on a map, build armies to defeat some opponents.
When thinking about it I think it could provide a good and fun example to try Akka.NET in depth. There are a lot of different rules in the game and some of them are quite specific, and a unit in the game could be implemented by an actor, imagine all the interactions that can happened between all of these actors.
When writing these lines I am only at the start of this journey and I don’t know if it is a good idea, but still I want to try. I don’t think I will handle the movement of the units and the graphic interface, I will focus on the interactions between the different units, buildings and technologies.
The setup
For this demo I will show you how to switch the behavior of a villager depending on the message (command) he receives. In the game a villager can do a lot of things: gathering resources, constructing buildings, repairing them, even fighting. For the moment I will focus on the resources gathering part.
In order to see the different amounts of resource available to the player, I created an actor which will store them:
You can notice that unlike in previous posts about Akka.NET, I used a new kind of actor: the TypedActor and I implemented an interface to specify the type of message this actor can handle. Now it is time to have a villager that will gather resources to increase these amounts.
The tests
I am using Specflow to write the acceptance tests I want to implement for the project and here are the firsts for the villager:
Feature: Villager ProfessionsScenario: A villager recolts food when ordered to gather fruits Given I have a villagerWhen he becomes a gathererThen he recolts foodScenario: A villager recolts food when ordered to becoma a shepherd Given I have a villagerWhen he becomes a shepherdThen he recolts food
And below you will find the implementation of these steps.
I am using Akka.TestKit and the shouldly library for the tests. With these scenarios we can understand that a villager can have several roles, even when gathering a single type of resource. I only put two professions in this example to shorten the code.
The villager implementation
Now I will show you the implementation of the villager actor to show how a behavior switching can be made when using Akka.NET.
publicclass VillagerActor : ReceiveActor
{privatereadonly IActorRef _resourcesSupervisor;public VillagerActor(IActorRef resourcesSupervisor){
_resourcesSupervisor = resourcesSupervisor;
Profession = Profession.Idle;}public Profession Profession {get;privateset;}public Resource ResourceToRecolt {get;privateset;}protectedoverridevoid PreStart(){base.PreStart();
Become(Idle);}privatevoid Idle(){
CommandsHandler();}privatevoid Gatherer(){
Profession = Profession.Gatherer;
ResourceToRecolt = Resource.Food;// repeat until new order or lack of bushes
_resourcesSupervisor.Tell(new ResourceRecolted { ResourceType = ResourceToRecolt, Quantity =10});
CommandsHandler();}privatevoid Shepherd(){
Profession = Profession.Shepherd;
ResourceToRecolt = Resource.Food;// repeat until new order or lack of sheeps
_resourcesSupervisor.Tell(new ResourceRecolted { ResourceType = ResourceToRecolt, Quantity =10});
CommandsHandler();}privatevoid CommandsHandler(){
Receive<GatherFruits>(m => Become(Gatherer));
Receive<ShepherdFlock>(m => Become(Shepherd));}}
Like in my introduction to Akka.NET I used the ReceiveActor which allows me to treat several types of message and to do different actions depending on the context.
At the first the villager is idle and just wait to receive an order to get to work (just like in the game). At the moment he can only be ordered to gather food from bushes or from sheep. When one of these two order arrives the “profession” of this villager change and he begins his work, gathering food in these cases (message sent to the supervisor actor to increment the food amount).
Yet a gatherer can at anytime receive the order to become a shepherd and this is done by using the Become method available for this type of actor (I extract this behavior in a separate method to avoid duplication).
I have written the following test to check that a villager can change its behavior:
[Fact(DisplayName ="VillagerActor Should Be Able To Change Profession")]publicvoid Be_Able_To_Change_Profession(){var villager = ActorOfAsTestActorRef<VillagerActor>(Props.Create<VillagerActor>(TestActor));var shepherdCommand =new ShepherdFlock();
villager.Tell(shepherdCommand);var gatherCommand =new GatherFruits();
villager.Tell(gatherCommand);
villager.UnderlyingActor.Profession.ShouldBe(Profession.Gatherer);}
Using this Become method is very helpful when designing Finite-State-Machine with Akka.NET.
A final word
This example is just an introduction regarding the behavior switching with the actor model, the example is quite simple at the moment. But I intent to make updates on the project to implement the rest of the possible gathering methods for a villager. There are a lot more rules to implement even in the area I just showed you.
I put the code on my GitHub account to allow you to browse the whole code and to see the improvements I will add over time. If you would like to see a particular set of rules implemented, let me know, I will continue to post articles about this project and the use of Akka.NET for it. And do not hesitate to tell me if you think something should be made differently, I am open to feedback.
When working with Object Oriented Programming (OOP) languages we have the possibility to design our code and our classes using encapsulation. C# defines the “protected” accessibility level, which is accessible only from the containing class and from the types that inherits from this class. It is very helpful when you follow the Open-Closed Principle (OCP).
On the other side you might ask yourself how can we test the behavior of the methods if they are protected. And how to do so without breaking the encapsulation of the class.
Testing a protected method
I created a small custom class to expose my way of doing unit tests on protected methods, here is a class to test:
The easiest thing I could do to be able to test my method is to replace the “protected” keyword by “public”. But I will not do that because, in my opinion when you write tests after the production code you should try to avoid updating the code as much as possible even to test it.
One other possibility is to make the method “internal”, this keyword specifies that the method can only be access from the current assembly. And then, for your tests project you can make them visible using the following attribute in the Properties/AssemblyInfo.cs file of your production project:
[assembly: InternalsVisibleTo("MyTestProject")]
This option is helpful when you want to limit the scope of an API defined in an assembly but without losing the ability to add unit tests on the entire project.
But again I will not use this trick to test my method, instead I will expose it using inheritance for my tests by creating a new class, only for testing purposes.
Note that, once again, I use the Shouldly library to make my assertion.
Testing a call to a protected method
The other day one of my coworker was asking how can he test that a protected method is called when testing a public method. This is a tricky question and it depends on the context of your code. In his case the given method was not part of our project and therefore impossible to modify. He was still able to test the behavior of the method by mocking another class used by this protected method.
I think this experience is interesting because it shows that you can still write automated tests by going one level deeper. You might ask yourself if this is still a unit test. Maybe, maybe not but it is a test for your project.
And this story made me think: “How to test the call to a protected method?”. I created the following class to show you a way to be able to do so.
publicclass MySecondClass
{protectedvoid InnerMethod(){//a lot of logic and dependencies}publicvoid DoWork(bool doWork){if(doWork){
InnerMethod();}}}
In my case I want to test that, depending on the parameter’s value, the DoWork method calls the InnerMethod method. But without executing the code of the latter because it does too many things and therefore the test will be too long (if you have a similar situation you might have some code smells to fix).
To write my tests, this time I will slightly update the code to be able to do what I want. I am not a big fan of this but I don’t really see another option that will not imply more refactoring.
protectedvirtualvoid InnerMethod(){//a lot of logic and dependencies}
I simply made the method virtual in order to be able to override it. I did not really break the encapsulation, I just gave me more options. Now I can create a new class for testing purposes:
This class inherits from the class I want to test and does not modify its behavior regarding the DoWork method. It is a test double using the spy technique. I can now write the two following tests to check the behavior of the code.
If you write tests after writing the production code it is still possible to do so without changing too much of the code even with protected methods. If the code has been written using encapsulation there must be a reason for that and therefore the tests should not force you to break everything down.
What about private methods?
Now you might ask yourself, how to do this with private methods. With these kind of methods we cannot use inheritance for tests, so how?
Well you can use Microsoft Fakes to mock the calls to private methods, but in my opinion this is definitely overkill. Our projects should be testable without tools like this.
The other solution is to change the accessibility of the method to make it testable, because you believe that “Tests trump Encapsulation“.
But first, I think that when you want to test a private method, you should ask yourself some questions first. Why is this method private? Does it really needs to be private? Can I extract the logic inside into another class I will be able to test? Can I include its logic in the test of another method?
Using encapsulation should mean something from a design point of view. Writing tests after the code is better than writing no test at all. It also make you ask questions about the code you wrote: “What do I want to test?”.
And I think this is why we saw the arrival of practice such as Test Driven Development (TDD) to force us to ask these questions first in order to help us with the design and encapsulation of the production code. I will not enter in the debate of whether should you practice TDD or not. Or does TDD lead to good design or not. I don’t know enough to answer these questions and I especially think that it depends on the developer.
In this blog post I wanted to show you how to test protected methods without having too much impacts on the code, I hope it will help you. And always ask yourself about the Why when it comes to tests and only after the How.
I already spoke about acceptance testing in older blog posts (here and here) but without showing any tool available to write them, until now! In this article I will show how it is possible to write acceptance tests using Specflow.
This framework allows you to write executable scenarios using the Gherkin syntax which is non technical and can be used by domain experts, business analysts, testers. And then the developers implement the tests details alongside the feature covered by these acceptance tests.
Setting up
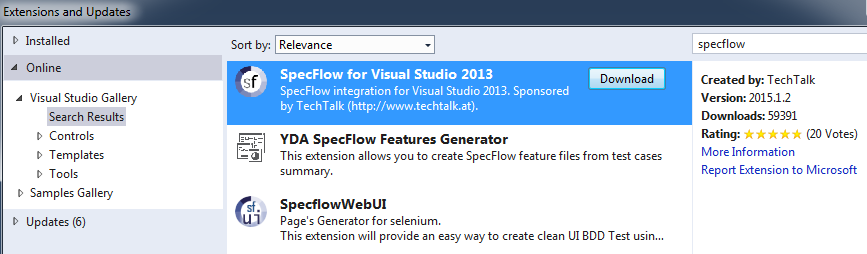
Specflow can work easily with Visual Studio, do to so you have to install the extension available in the extensions manager (see screenshot below).
This extension offers various file templates allowing to write test scenarios, I will come to this later. You will also need the nuget package for the test project where you will add the acceptance tests:
Install-Package Specflow
By default Specflow uses NUnit as unit test provider but you can change it through configuration if you want to, for example I will use MsTest for the demo, then I have to update the App.config file:
You should now have everything needed to write your scenarios.
Adding a feature
It is time to create our first Feature file to define the behavior of our system. When adding a new file to the test project you should be able to choose the Feature File option (installed by Specflow):
This will create a .feature file containing scenarios definitions using the Gherkin syntax. For the example I have created a scenario testing the behavior of a simple calculator:
# Calculator.featureFeature: Calculator I want to test the behavior of a CalculatorScenario: Add two numbers Given I have a CalculatorWhen I add 17 to 25Then the result should be 42
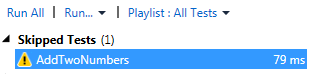
As you can see the syntax is very user-friendly and can be understood by everyone in the team (it’s just English!). Now if you try to run this test (the scenario) it will neither fail nor pass, it has no implementation therefore it will be skipped:
The test name has been generated from the scenario name, this allow you to make them clear. Scenarios can be written and committed/checked-in into the source control without adding failing tests which might break a build (depending on its configuration). Therefore they can be added early in the process and not at the end of the development cycle.
Creating the steps
In order to implement the scenarios of a feature, Specflow needs Step definitions to operate, you can use another file template to create a class defining the steps.
Or you can create the class yourself in order to obtain the following code.
[Binding]publicclass CalculatorSteps
{[Given(@"I have a Calculator")]publicvoid GivenIHaveACalculator(){
ScenarioContext.Current.Pending();}[When(@"I add 17 to 25")]publicvoid WhenIAddTo(){
ScenarioContext.Current.Pending();}[Then(@"the result should be 42")]publicvoid ThenTheResultShouldBe(){
ScenarioContext.Current.Pending();}}
The BindingAttribute allows Specflow to know that step definitions are present in the file, if you omit it there will be no binding between the feature and the steps, don’t forget it! It is also possible to generate the steps from the feature file using the right-click and the “Generate Step Definitions” option (very helpful).
With this implementation the scenario will still be skipped without failing, you now have a skeleton to work with. Now it is time for the developers to do their part of the work.
Implementing the code
I will now create a Calculator class with an Add method having two integer parameters and a Result property to expose the result.
publicclass Calculator
{publicint Result {get;privateset;}publicvoidAdd(int first, int second){
Result = first + second;}}
I will also implement the steps to use my new Calculator class.
[Binding]publicclass CalculatorSteps
{private Calculator _calculator;[Given(@"I have a Calculator")]publicvoid GivenIHaveACalculator(){
_calculator =new Calculator();}[When(@"I add 17 to 25")]publicvoid WhenIAddTo(){
_calculator.Add(17, 25);}[Then(@"the result should be 42")]publicvoid ThenTheResultShouldBe(){
_calculator.Result.ShouldBe(42);}}
I used Shouldly to make my assertion in the last step. And now the test is green!
We have implemented our first test using Specflow, congratulations! Yet this demo is not over, there are a few more functionalities I would like to show.
Using scenario parameters
Right now our scenario test only one combination for the Add method and I definitely don’t want to write a scenario for each combination I want to test. Of course Specflow can handle this, using a scenario outline.
# Calculator.featureFeature: Calculator I want to test the behavior of a CalculatorScenario Outline: Add two numbers Given I have a CalculatorWhen I add <first> to <second>Then the result should be <result>Examples: | first | second | result | | 17 | 25 | 42 | | 10 | 78 | 88 | | 2 | 25 | 27 | | 5 | -17 | -12 |
I will also need to update the step definitions to match the scenario outline, it is possible to add method parameters to steps and match them using regular expressions.
[Binding]publicclass CalculatorSteps
{private Calculator _calculator;[Given(@"I have a Calculator")]publicvoid GivenIHaveACalculator(){
_calculator =new Calculator();}[When(@"I add (.*) to (.*)")]publicvoid WhenIAddTo(int first, int second){
_calculator.Add(first, second);}[Then(@"the result should be (.*)")]publicvoid ThenTheResultShouldBe(int result){
_calculator.Result.ShouldBe(result);}}
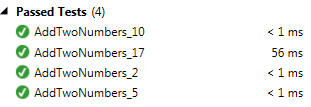
My scenario can now take parameters and test several cases, I will have one test per example:
But as you can see the test names are not very relevant, Specflow use the first parameter value to generate these names and if you have several examples using the same example value it will be even less clear.
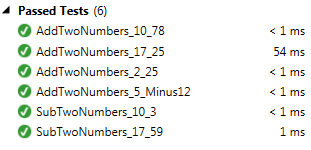
I know a trick to prevent that: adding a description parameter only for naming purposes.
It is not perfect but it might help. If you know a better way, feel free to share it.
Using existing steps
Once a step is implementing you can use it again in another scenario, or even another feature so you will avoid a lot of duplication. In my example I will now add a scenario to test the subtraction of the Calculator class.
Scenario Outline: Sub two numbers Given I have a CalculatorWhen I subtract <first> to <second>Then the result should be <result>Examples: | description | first | second | result | | 17_59 | 17 | 59 | -42 | | 10_3 | 10 | 3 | 7 |
I will add the following method to the calculator class and the implementation of the new “when” step, the others already exist.
//Calculator.cspublicvoid Subtract(int first, int second){
Result = first - second;}//CalculatorSteps.cs[When(@"I subtract (.*) to (.*)")]publicvoid WhenISubtractTo(int first, int second){
_calculator.Subtract(first, second);}
And this is it, I now have two more tests without having to write a lot of testing logic.
It is essential to reuse existing steps when working with Specflow in order to avoid too much duplication.
Using the scenario context
Now I want to get rid of the Result property in my Calculator class because I think it does not “feel” right, I prefer having methods directly returning the result.
publicclass Calculator
{publicintAdd(int first, int second){return first + second;}publicint Subtract(int first, int second){return first - second;}}
But now I have a problem inside my steps, how can I test the result if it is returned in another step? I don’t want to refactor the entire feature. The good news is that I don’t need to, I will change the step definitions without touching the feature file.
I will use the ScenarioContext to pass data from one step to another, like this:
[Binding]publicclass CalculatorSteps
{private Calculator _calculator;[Given(@"I have a Calculator")]publicvoid GivenIHaveACalculator(){
_calculator =new Calculator();}[When(@"I add (.*) to (.*)")]publicvoid WhenIAddTo(int first, int second){var result = _calculator.Add(first, second);
ScenarioContext.Current.Add("result", result);}[When(@"I subtract (.*) to (.*)")]publicvoid WhenISubtractTo(int first, int second){var result = _calculator.Subtract(first, second);
ScenarioContext.Current.Add("result", result);}[Then(@"the result should be (.*)")]publicvoid ThenTheResultShouldBe(int result){var actualResult = ScenarioContext.Current.Get<int>("result");
actualResult.ShouldBe(result);}}
The tests are passing again, I was able to refactor my production code (the Calculator class) without modifying the scenarios. Specflow creates a separation between the feature specification and its implementation.
Time to conclude
This is the end of my introduction to Specflow, which I believe is a great tool for writing acceptance tests. It is easy to write feature scenarios you can use as executable specifications. In my example I use English but it is also available in several languages, so your domain experts should have a very good excuse for not writing them.
Specflow is also simple to configure to be used inside Visual Studio to be coupled with your favorite automated testing framework and there is even auto completion in the feature file for the Gherkin syntax or to find existing steps.
It has a lot more functionalities I did not mention in this blog post. It can also work with Selenium in order to create end-to-end scenarios for web applications. You now have the tool to practice Behavior Driven Development (BDD) with your team.
Let me know if you would like to know more about Specflow.
 Several months ago I wrote an article to share my experience of a web developer moving to the world of mobile applications development. I am working in this field using the Xamarin technology. And you might have heard that Microsoft just acquired Xamarin, but I will not speak about this topic in this blog post, I do not have any opinion at the moment regarding this news.