Easy mocking with NSubstitute

NSubstitute logo
NSubstitute logo

Several months ago I introduced the concept of mocking dependencies of a class in order to ease the writing of tests for it. I also introduced the Moq library which is a mocking library and today I will introduced another one: NSubstitute. This project is open source and you can find it on GitHub.

I will not cover all the functionalities it offers, instead I will show you how it works with an example like I did with Moq. First you can install NSubstitute with Nuget:

Install-Package NSubstitute

What to test?

I have created the following service with a bit of logic to test.

public class NotificationService
{
    public NotificationService(IUserRepository userRepository, INotifier notifier, ILogger logger)
    {
        _userRepository = userRepository;
        _notifier = notifier;
        _logger = logger;
    }
 
    private readonly IUserRepository _userRepository;
    private readonly INotifier _notifier;
    private readonly ILogger _logger;
 
    public void NotifyUser(int userId)
    {
        User user;
        try
        {
            user = _userRepository.GetById(userId);
        }
        catch (Exception ex)
        {
            _logger.Error(ex.Message);
            return;
        }
        if (user.HasActivatedNotification)
        {
            _notifier.Notify(user);
        }
    }
}

This service relies on dependency injection to do its work, you’ll find these dependencies below.

public interface INotifier
{
    void Notify(User user);
}
 
public interface IUserRepository
{
    User GetById(int userId);
}
 
public interface ILogger
{
    void Error(string message);
}
 
public class User
{
    public bool HasActivatedNotification { get; set; }
}
 
public class InvalidUserIdException : Exception
{
    public override string Message
    {
        get { return "Given user ID is invalid"; }
    }
}

Let’s test it!

I will now write tests to cover the logic hold by the NotificationService class using NSubstitute. I will also use xUnit as testing framework, you can find more information about this project here.

In order to test the service we will have to instantiate it, and therefore we will have to inject the dependencies. So the first question is: how to create mock (or substitute) with NSubstitute? As a reminder it is done like this with Moq:

Mock<IUserRepository> mockRepository = new Mock<IUserRepository>();
IUserRepository repo = mockRepository.Object;

With NSubstitute the concept is similar but with one noticeable change.

IUserRepository userRepository = Substitute.For<IUserRepository>();

There is no wrapper for the mock, we directly manipulate an instance of the interface we want to substitute. You might wonder how to use it as a mock if it has only the methods defined in the interface, I’ll come to that later.

We can now setup our test class for the service with all the dependencies.

public class NotificationService_Should
{
    private readonly NotificationService _service;
 
    private readonly IUserRepository _userRepository;
    private readonly INotifier _notifier;
    private readonly ILogger _logger;
 
    public NotificationService_Should()
    {
        _userRepository = Substitute.For<IUserRepository>();
        _notifier = Substitute.For<INotifier>();
        _logger = Substitute.For<ILogger>();
 
        _service = new NotificationService();
    }
}

For information, the test setup is done in the class constructor with xUnit.

We can now focus on writing the first test for the class: verifying that the repository is called when executing the NotifyUser method. To do so we will use some extension methods provided by NSubstitute (here is the answer to the previous question).

[Fact(DisplayName = "NotifyUser calls the repository")]
public void Call_Repository()
{
    _service.NotifyUser(Arg.Any<int>());
    _userRepository.Received().GetById(Arg.Any<int>());
}

The Received() extension method checks that the following method is called. Since we don’t have to test for a particular user ID, we can use the Arg.Any<T>() method to specify that any integer is valid (with Moq it is It.IsAny<T>()). We run the test and…

Red-Test-Null

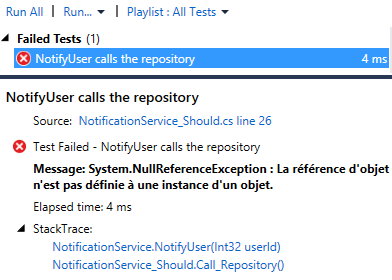
…it’s red? NullReferenceException… Of course! The mock repository does not return any instance of User and the execution fails after when trying to use the reference. Let’s fix this by configuring the substitute.

[Fact(DisplayName = "NotifyUser calls the repository")]
public void Call_Repository()
{
    _userRepository.GetById(Arg.Any<int>()).Returns(new User());
    _service.NotifyUser(1);
    _userRepository.Received().GetById(Arg.Any<int>());
}

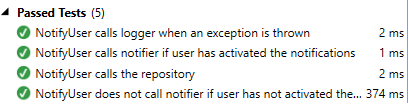
Now the test is green, but in this test we setup a mock and then we test that it has been called, in my opinion it is not very constructive. We should try to focus on testing something else, the rest of the method’s logic depends on a property of the User, let’s test this for instance.

public NotificationService_Should()
{
    _userRepository = Substitute.For<IUserRepository>();
    _notifier = Substitute.For<INotifier>();
    _logger = Substitute.For<ILogger>();
 
    _service = new NotificationService(_userRepository, _notifier, _logger);
 
    _userRepository
        .GetById(Arg.Is<int>(i => i < 10))
        .Returns(new User { HasActivatedNotification = true });
    _userRepository
        .GetById(Arg.Is<int>(i => i >= 10))
        .Returns(new User { HasActivatedNotification = false });
}
 
[Fact(DisplayName = "NotifyUser calls notifier if user has activated the notifications")]
public void Call_Notifier_When_User_Has_Activated_Notification()
{
    _service.NotifyUser(1);
    _notifier.Received().Notify(Arg.Any<User>());
}
 
[Fact(DisplayName = "NotifyUser does not call notifier if user has not activated the notifications")]
public void Does_Not_Call_Notifier_When_User_Has_Not_Activated_Notification()
{
    _service.NotifyUser(11);
    _notifier.DidNotReceive().Notify(Arg.Any<User>());
}

This time I used the Arg.Is<T>() method to add condition to the substitute, this way I can setup the result of a method depending on some conditions. Here I set the HasActivatedNotification property to true if the userId is inferior to 10 and to false otherwise.

And to test that a method is not called I use the DidNotReceive() extension method. Now I will write a test for the case when an exception is thrown by the repository to check that the logger is correctly called.

public NotificationService_Should()
{
    _userRepository = Substitute.For<IUserRepository>();
    _notifier = Substitute.For<INotifier>();
    _logger = Substitute.For<ILogger>();
 
    _service = new NotificationService(_userRepository, _notifier, _logger);
 
    _userRepository
        .GetById(Arg.Is<int>(i => i < 10))
        .Returns(new User { HasActivatedNotification = true });
    _userRepository
        .GetById(Arg.Is<int>(i => i >= 10))
        .Returns(new User { HasActivatedNotification = false });
    _userRepository
        .GetById(Arg.Is<int>(i => i < 0))
        .Returns(user => { throw new InvalidUserIdException(); });
}
 
[Fact(DisplayName = "NotifyUser calls logger when an exception is thrown")]
public void Call_Logger_When_An_Exception_Is_Thrown()
{
    _service.NotifyUser(-1);
    _logger.Received().Error("Given user ID is invalid");
}

The service is now covered with tests thanks to the use of NSubstitute.

Green-Tests

This library offers more functionalities, you can find them on the documentation page of the project website.

As for me, I only discovered this library recently, I am more used to Moq. But I must say that I like the API offered by NSubstitute, I find it more “fluent”. I think it can be really helpful when doing Test Driven Development (TDD). I will definitely give it a shot for future projects.

Choosing a mocking library is important in order to write tests easily when using dependency injection and there is a lot of choice for this, Moq and NSubstitute are some of them. And you? What is your favorite library for mocking? What does it offer that others don’t have?

See you next time!

Unit tests and protected methods

protected-padlockWhen working with Object Oriented Programming (OOP) languages we have the possibility to design our code and our classes using encapsulation. C# defines the “protected” accessibility level, which is accessible only from the containing class and from the types that inherits from this class. It is very helpful when you follow the Open-Closed Principle (OCP).

On the other side you might ask yourself how can we test the behavior of the methods if they are protected. And how to do so without breaking the encapsulation of the class.

Testing a protected method

I created a small custom class to expose my way of doing unit tests on protected methods, here is a class to test:

public class MyClass
{
    public int Counter { get; private set; }

    protected void IncrementCounter()
    {
        Counter++;
    }
}

The easiest thing I could do to be able to test my method is to replace the “protected” keyword by “public”. But I will not do that because, in my opinion when you write tests after the production code you should try to avoid updating the code as much as possible even to test it.

One other possibility is to make the method “internal”, this keyword specifies that the method can only be access from the current assembly. And then, for your tests project you can make them visible using the following attribute in the Properties/AssemblyInfo.cs file of your production project:

[assembly: InternalsVisibleTo("MyTestProject")]

This option is helpful when you want to limit the scope of an API defined in an assembly but without losing the ability to add unit tests on the entire project.

But again I will not use this trick to test my method, instead I will expose it using inheritance for my tests by creating a new class, only for testing purposes.

public class MyTestClass : MyClass
{
    public void ExposeIncrementCounter()
    {
         base.IncrementCounter();
    }
}

With this new class I can now test the behavior of the protected method without modifying it. And here is my test:

[TestMethod]
public void Test_MyClass()
{
    var myClass = new MyTestClass();
    myClass.ExposeIncrementCounter();
    myClass.Counter.ShouldBe(1);
}

Note that, once again, I use the Shouldly library to make my assertion.

Testing a call to a protected method

The other day one of my coworker was asking how can he test that a protected method is called when testing a public method. This is a tricky question and it depends on the context of your code. In his case the given method was not part of our project and therefore impossible to modify. He was still able to test the behavior of the method by mocking another class used by this protected method.

I think this experience is interesting because it shows that you can still write automated tests by going one level deeper. You might ask yourself if this is still a unit test. Maybe, maybe not but it is a test for your project.

And this story made me think: “How to test the call to a protected method?”. I created the following class to show you a way to be able to do so.

public class MySecondClass
{
    protected void InnerMethod()
    {
        //a lot of logic and dependencies
    }

    public void DoWork(bool doWork)
    {
        if (doWork)
        {
            InnerMethod();
        }
    }
}

In my case I want to test that, depending on the parameter’s value, the DoWork method calls the InnerMethod method. But without executing the code of the latter because it does too many things and therefore the test will be too long (if you have a similar situation you might have some code smells to fix).

To write my tests, this time I will slightly update the code to be able to do what I want. I am not a big fan of this but I don’t really see another option that will not imply more refactoring.

protected virtual void InnerMethod()
{
    //a lot of logic and dependencies
}

I simply made the method virtual in order to be able to override it. I did not really break the encapsulation, I just gave me more options. Now I can create a new class for testing purposes:

public class MySecondTestClass : MySecondClass
{
    public bool InnerMethodHasBeenCalled { get; private set; }

    protected override void InnerMethod()
    {
        InnerMethodHasBeenCalled = true;
    }
}

This class inherits from the class I want to test and does not modify its behavior regarding the DoWork method. It is a test double using the spy technique. I can now write the two following tests to check the behavior of the code.

[TestMethod]
public void Test_MySecondClass_False()
{
    var myClass = new MySecondTestClass();
    myClass.DoWork(false);
    myClass.IncrementCounterHasBeenCalled.ShouldBe(false);
}

[TestMethod]
public void Test_MySecondClass_True()
{
    var myClass = new MySecondTestClass();
    myClass.DoWork(true);
    myClass.IncrementCounterHasBeenCalled.ShouldBe(true);
}

If you write tests after writing the production code it is still possible to do so without changing too much of the code even with protected methods. If the code has been written using encapsulation there must be a reason for that and therefore the tests should not force you to break everything down.

What about private methods?

Now you might ask yourself, how to do this with private methods. With these kind of methods we cannot use inheritance for tests, so how?

Well you can use Microsoft Fakes to mock the calls to private methods, but in my opinion this is definitely overkill. Our projects should be testable without tools like this.

The other solution is to change the accessibility of the method to make it testable, because you believe that “Tests trump Encapsulation“.

But first, I think that when you want to test a private method, you should ask yourself some questions first. Why is this method private? Does it really needs to be private? Can I extract the logic inside into another class I will be able to test? Can I include its logic in the test of another method?

Using encapsulation should mean something from a design point of view. Writing tests after the code is better than writing no test at all. It also make you ask questions about the code you wrote: “What do I want to test?”.

And I think this is why we saw the arrival of practice such as Test Driven Development (TDD) to force us to ask these questions first in order to help us with the design and encapsulation of the production code. I will not enter in the debate of whether should you practice TDD or not. Or does TDD lead to good design or not. I don’t know enough to answer these questions and I especially think that it depends on the developer.

In this blog post I wanted to show you how to test protected methods without having too much impacts on the code, I hope it will help you. And always ask yourself about the Why when it comes to tests and only after the How.

See you next time!

Writing acceptance tests with Specflow

Specflow logo
Specflow logo

I already spoke about acceptance testing in older blog posts (here and here) but without showing any tool available to write them, until now! In this article I will show how it is possible to write acceptance tests using Specflow.

This framework allows you to write executable scenarios using the Gherkin syntax which is non technical and can be used by domain experts, business analysts, testers. And then the developers implement the tests details alongside the feature covered by these acceptance tests.

Setting up

Specflow can work easily with Visual Studio, do to so you have to install the extension available in the extensions manager (see screenshot below).

specflow-extension

This extension offers various file templates allowing to write test scenarios, I will come to this later. You will also need the nuget package for the test project where you will add the acceptance tests:

Install-Package Specflow

By default Specflow uses NUnit as unit test provider but you can change it through configuration if you want to, for example I will use MsTest for the demo, then I have to update the App.config file:

<configuration>
  <configSections>
    <section name="specFlow" type="TechTalk.SpecFlow.Configuration.ConfigurationSectionHandler, TechTalk.SpecFlow" />
  </configSections>
  <specFlow>
    <unitTestProvider name="MsTest"/>
  </specFlow>
</configuration>

You should now have everything needed to write your scenarios.

Adding a feature

It is time to create our first Feature file to define the behavior of our system. When adding a new file to the test project you should be able to choose the Feature File option (installed by Specflow):

adding-feature

This will create a .feature file containing scenarios definitions using the Gherkin syntax. For the example I have created a scenario testing the behavior of a simple calculator:

# Calculator.feature
Feature: Calculator
	I want to test the behavior of a Calculator

Scenario: Add two numbers
	Given I have a Calculator
	When I add 17 to 25
	Then the result should be 42

As you can see the syntax is very user-friendly and can be understood by everyone in the team (it’s just English!). Now if you try to run this test (the scenario) it will neither fail nor pass, it has no implementation therefore it will be skipped:

skipped-test

The test name has been generated from the scenario name, this allow you to make them clear. Scenarios can be written and committed/checked-in into the source control without adding failing tests which might break a build (depending on its configuration). Therefore they can be added early in the process and not at the end of the development cycle.

Creating the steps

In order to implement the scenarios of a feature, Specflow needs Step definitions to operate, you can use another file template to create a class defining the steps.

adding-steps

Or you can create the class yourself in order to obtain the following code.

[Binding]
public class CalculatorSteps
{
    [Given(@"I have a Calculator")]
    public void GivenIHaveACalculator()
    {
        ScenarioContext.Current.Pending();
    }
 
    [When(@"I add 17 to 25")]
    public void WhenIAddTo()
    {
        ScenarioContext.Current.Pending();
    }
 
    [Then(@"the result should be 42")]
    public void ThenTheResultShouldBe()
    {
        ScenarioContext.Current.Pending();
    }
}

The BindingAttribute allows Specflow to know that step definitions are present in the file, if you omit it there will be no binding between the feature and the steps, don’t forget it! It is also possible to generate the steps from the feature file using the right-click and the “Generate Step Definitions” option (very helpful).

With this implementation the scenario will still be skipped without failing, you now have a skeleton to work with. Now it is time for the developers to do their part of the work.

Implementing the code

I will now create a Calculator class with an Add method having two integer parameters and a Result property to expose the result.

public class Calculator
{
    public int Result { get; private set; }
 
    public void Add(int first, int second)
    {
        Result = first + second;
    }
}

I will also implement the steps to use my new Calculator class.

[Binding]
public class CalculatorSteps
{
    private Calculator _calculator;
 
    [Given(@"I have a Calculator")]
    public void GivenIHaveACalculator()
    {
        _calculator = new Calculator();
    }
 
    [When(@"I add 17 to 25")]
    public void WhenIAddTo()
    {
        _calculator.Add(17, 25);
    }
 
    [Then(@"the result should be 42")]
    public void ThenTheResultShouldBe()
    {
        _calculator.Result.ShouldBe(42);
    }
}

I used Shouldly to make my assertion in the last step. And now the test is green!

passing-test

We have implemented our first test using Specflow, congratulations! Yet this demo is not over, there are a few more functionalities I would like to show.

Using scenario parameters

Right now our scenario test only one combination for the Add method and I definitely don’t want to write a scenario for each combination I want to test. Of course Specflow can handle this, using a scenario outline.

# Calculator.feature
Feature: Calculator
	I want to test the behavior of a Calculator

Scenario Outline: Add two numbers
	Given I have a Calculator
	When I add <first> to <second>
	Then the result should be <result>
	
	Examples: 
	| first | second | result |
	| 17    | 25     | 42     |
	| 10    | 78     | 88     |
	| 2     | 25     | 27     |
	| 5     | -17    | -12    |

I will also need to update the step definitions to match the scenario outline, it is possible to add method parameters to steps and match them using regular expressions.

[Binding]
public class CalculatorSteps
{
    private Calculator _calculator;
 
    [Given(@"I have a Calculator")]
    public void GivenIHaveACalculator()
    {
        _calculator = new Calculator();
    }
 
    [When(@"I add (.*) to (.*)")]
    public void WhenIAddTo(int first, int second)
    {
        _calculator.Add(first, second);
    }
 
    [Then(@"the result should be (.*)")]
    public void ThenTheResultShouldBe(int result)
    {
        _calculator.Result.ShouldBe(result);
    }
}

My scenario can now take parameters and test several cases, I will have one test per example:

bad-test-naming

But as you can see the test names are not very relevant, Specflow use the first parameter value to generate these names and if you have several examples using the same example value it will be even less clear.

I know a trick to prevent that: adding a description parameter only for naming purposes.

| description | first | second | result |
| 17_25       | 17    | 25     | 42     |
| 10_78       | 10    | 78     | 88     |
| 2_25        | 2     | 25     | 27     |
| 5_minus12   | 5     | -17    | -12    |

good-test-naming

It is not perfect but it might help. If you know a better way, feel free to share it.

Using existing steps

Once a step is implementing you can use it again in another scenario, or even another feature so you will avoid a lot of duplication. In my example I will now add a scenario to test the subtraction of the Calculator class.

Scenario Outline: Sub two numbers
	Given I have a Calculator
	When I subtract <first> to <second>
	Then the result should be <result>

	Examples: 
	| description | first | second | result |
	| 17_59       | 17    | 59     | -42    |
	| 10_3        | 10    | 3      | 7      |

I will add the following method to the calculator class and the implementation of the new “when” step, the others already exist.

//Calculator.cs
public void Subtract(int first, int second)
{
    Result = first - second;
}
 
//CalculatorSteps.cs
[When(@"I subtract (.*) to (.*)")]
public void WhenISubtractTo(int first, int second)
{
    _calculator.Subtract(first, second);
}

And this is it, I now have two more tests without having to write a lot of testing logic.

sub-tests

It is essential to reuse existing steps when working with Specflow in order to avoid too much duplication.

Using the scenario context

Now I want to get rid of the Result property in my Calculator class because I think it does not “feel” right, I prefer having methods directly returning the result.

public class Calculator
{
    public int Add(int first, int second)
    {
        return first + second;
    }
 
    public int Subtract(int first, int second)
    {
        return first - second;
    }
}

But now I have a problem inside my steps, how can I test the result if it is returned in another step? I don’t want to refactor the entire feature. The good news is that I don’t need to, I will change the step definitions without touching the feature file.

I will use the ScenarioContext to pass data from one step to another, like this:

[Binding]
public class CalculatorSteps
{
    private Calculator _calculator;
 
    [Given(@"I have a Calculator")]
    public void GivenIHaveACalculator()
    {
        _calculator = new Calculator();
    }
 
    [When(@"I add (.*) to (.*)")]
    public void WhenIAddTo(int first, int second)
    {
        var result = _calculator.Add(first, second);
        ScenarioContext.Current.Add("result", result);
    }
 
    [When(@"I subtract (.*) to (.*)")]
    public void WhenISubtractTo(int first, int second)
    {
        var result = _calculator.Subtract(first, second);
        ScenarioContext.Current.Add("result", result);
    }
 
 
    [Then(@"the result should be (.*)")]
    public void ThenTheResultShouldBe(int result)
    {
        var actualResult = ScenarioContext.Current.Get<int>("result");
        actualResult.ShouldBe(result);
    }
}

The tests are passing again, I was able to refactor my production code (the Calculator class) without modifying the scenarios. Specflow creates a separation between the feature specification and its implementation.

Time to conclude

This is the end of my introduction to Specflow, which I believe is a great tool for writing acceptance tests. It is easy to write feature scenarios you can use as executable specifications. In my example I use English but it is also available in several languages, so your domain experts should have a very good excuse for not writing them.

Specflow is also simple to configure to be used inside Visual Studio to be coupled with your favorite automated testing framework and there is even auto completion in the feature file for the Gherkin syntax or to find existing steps.

It has a lot more functionalities I did not mention in this blog post. It can also work with Selenium in order to create end-to-end scenarios for web applications. You now have the tool to practice Behavior Driven Development (BDD) with your team.

Let me know if you would like to know more about Specflow.

See you next time!

Better testing experience with Shouldly

Shouldly Logo
Shouldly Logo

I am a strong believer in unit testing, I like to write lots of tests for my code in order to make sure I do not regress when implementing new features on my projects. I love having a safety net when working.

Then it is important to make sure that the tests are easy to write and that they give a good feedback when failing. When a test fails you should be able to know exactly where the code under test has an incorrect behavior to fix it as soon as possible.

Shouldly is a .NET assertion library very helpful for this matter, it provides a lot of extensions for various types making them easy to test. It is available on GitHub and as a Nuget package:

Install-Package Shouldly

Simple assertions

Let’s dive into the topic to see how it can be used, I’ll start with simple assertions on an integer value:

var value = 5;
value.ShouldBe(5);
value.ShouldBeGreaterThan(4);
value.ShouldBeGreaterThanOrEqualTo(5);
value.ShouldBeInRange(0, 10);
value.ShouldBeLessThan(6);
value.ShouldBeOneOf(2, 5, 7);

It is as simple as that, not need for any Assert method, Shouldly does it for you. And there are many more extensions to test about everything you want.

Now, we can have a look at the assertions available for the string type:

var myString = "foo";
myString.ShouldNotBeEmpty();
myString.ShouldNotBe(null);
myString.ShouldStartWith("f");
myString.ShouldEndWith("oo");
myString.ShouldNotContain("bar");
myString.ShouldBe("FOO", Case.Insensitive);

Likewise, Shouldly offers various methods in order to test a string value to make sure everything behaves as expected.

The library offers also some assertions to check the behavior of a method through actions:

Should.NotThrow(() => SuccessMethod());
Should.CompleteIn(() => SuccessMethod(), TimeSpan.FromMilliseconds(50));

As you can see you can write performances tests for your methods using the CompleteIn() method.

Specific error messages

Now that we have written some tests using Shouldly, let’s have a look at what happens when a test fails. As I said it is important to have comprehensive error messages when an error occurred in order to be able to debug quickly.

int value = 5;
value.ShouldBeGreaterThan(6);

Of course this test fails, and generates the following error message:

    value
        should be greater than
    6
        but was
    5

I find that this message is quite clear and gives us a good understanding of what went wrong, it even contains the name of the tested variable. Now let’s see how is the message with an enumerable.

var numbers = new[] { 1, 2, 4 };
numbers.ShouldBe(new []{1, 2, 3});
    numbers
        should be
    [1, 2, 3]
        but was
    [1, 2, 4]
        difference
    [1, 2, *4*]

The library highlights the difference for us, again I find the message pretty clean, especially when you compare it with the MSTest version:

var numbers = new[] { 1, 2, 4 };
CollectionAssert.AreEqual(new[] { 1, 2, 3 }, numbers);
CollectionAssert.AreEqual failed. (Element at index 2 do not match.)

Here are a few more examples.

Should.NotThrow(() => FailingMethod());
    Should
        not throw 
    System.ApplicationException
        but does
Should.CompleteIn(() => LongMethod(), TimeSpan.FromMilliseconds(50));
    Task
        should complete in
    00:00:00.0500000
        but did not

Shouldly is easy to install and easy to use and, in my opinion, makes testing code much clearer. It provides a lot of helpful extensions and if you find that one is missing you can contribute to the project to make it available to everyone.

I think that testing code should be treated with the same respect than production code and this is why it should me made as clean as possible and as understandable as possible, this way your tests are a part of the documentation of your code.

See you next time!

Testing Akka.NET actors with Akka.TestKit

In my last blog post I introduced the actor model using the Akka.NET framework. And since I like to write unit tests for my projects I was wondering how to test the few actors I have created even if there is not much logic inside them.

I believe that understanding how to write tests for a given technology early is important in order to avoid creating too much coupling. And also tests provide rapid feedback helping us to debug what we are creating, if you can debug quickly you can learn quickly.

When working with Akka.NET, you can use Akka.TestKit to write the tests for your actor system. Then there are several nuget packages depending on the testing framework you use.

Install-Package Akka.TestKit.VsTest

Install-Package Akka.TestKit.NUnit

Install-Package Akka.TestKit.Xunit

In my case I will use the VsTest package for MSTest.

Writing your first test

I will start by testing the behavior of the BlueActor, here is its definition:

public class BlueActor : ReceiveActor
{
    private const string ActorName = "BlueActor";
    private const ConsoleColor MessageColor = ConsoleColor.Blue;
 
    private int _counter = 0;
 
    protected override void PreStart()
    {
        base.PreStart();
        Become(HandleString);
    }
 
    private void HandleString()
    {
        Receive<string>(s =>
        {
            PrintMessage(s);
            _counter++;
            Sender.Tell(new MessageReceived(_counter));
        });
    }
 
    private void PrintMessage(string message)
    {
        Console.ForegroundColor = MessageColor;
        Console.WriteLine(
            "{0} on thread #{1}: {2}",
            ActorName,
            Thread.CurrentThread.ManagedThreadId,
            message);
    }
}

As you can see, there is not much to test, I can’t really test that the actor is writing something on the Console. But I might be able to test that it replies to the sender with a message containing a counter.

In my example the sender was an instance of a GreenActor but in a testing context it does not have to be that way. Let’s use TestKit to write a test.

[TestClass]
public class BlueActorTests : TestKit
{
    [TestCleanup]
    public void Cleanup()
    {
        Shutdown();
    }
 
    [TestMethod]
    public void BlueActor_Respond_With_Counter()
    {
        var actor = ActorOfAsTestActorRef<BlueActor>();
        actor.Tell("test");
        var answer = ExpectMsg<MessageReceived>();
        Assert.AreEqual(1, answer.Counter);
    }
}

The test class inherits from TestKit in order to access a set of functionalities allowing to test an actor. Since an actor “lives” inside an actor system in an asynchronous way, it would be a real pain to mock everything, TestKit does it for us.

I can now use the ActorOfAsTestActorRef<T> method in order to get an IActorRef wrapped in a specific instance dedicated to testing. In this context the message sender is the test class, I can then test that the actor replies with a MessageReceived instance. To do so I can use the ExpectMsg<T> method to do the check and to retrieve the message, if there is no message of this type the test fails.

It is also important to call the Shutdown method after running the tests in order to dispose of the actor system without risking to produce memory leak.

Testing another actor

I will now write a test for the YellowActor, see definition below.

public class YellowActor : UntypedActor
{
    private const string ActorName = "YellowActor";
    private const ConsoleColor MessageColor = ConsoleColor.Yellow;
 
    private IActorRef _greenActor;
 
    protected override void PreStart()
    {
        base.PreStart();
 
        _greenActor = Context.ActorOf<GreenActor>();
    }
 
    protected override void OnReceive(object message)
    {
        if (message is string)
        {
            var msg = message as string;
 
            PrintMessage(msg);
            _greenActor.Tell(msg);
        }
    }
 
    private void PrintMessage(string message)
    {
        Console.ForegroundColor = MessageColor;
        Console.WriteLine(
            "{0} on thread #{1}: {2}",
            ActorName,
            Thread.CurrentThread.ManagedThreadId,
            message);
    }
}

There is no reply to check, this actor just transfer the message to another actor after printing it. I can still write a test if I want.

[TestClass]
public class YellowActorTests : TestKit
{
    [TestCleanup]
    public void Cleanup()
    {
        Shutdown();
    }
 
    [TestMethod]
    public void YellowActor_Should_Not_Answer()
    {
        var actor = ActorOfAsTestActorRef<YellowActor>();
        actor.Tell("test");
        ExpectNoMsg();
    }
}

In this test I use the ExpectNoMsg method to verify that the actor does not answer. The test pass but I would like to test that the message is transferred to another actor. Unfortunately at the moment I cannot (or I did not find the way to do it) without changing the code of the actor.

The greenActor IActorRef is created by the actor itself and therefore is not a TestActorRef. To change this, I will inject the actor reference in the constructor, this way I will be able to use a testing reference when running tests. I add the following constructor to the YellowActor class:

public YellowActor(IActorRef greenActor)
{
    _greenActor = greenActor;
}

And I remove the PreStart method. At this point the code does not compile, I have to update the code creating the actor.

var yellowProps = Props.Create<YellowActor>(actorSystem.ActorOf<GreenActor>());
var yellowActor = actorSystem.ActorOf(yellowProps);

This is one of several way to inject dependencies to an actor. And I can now update my test to check that a message is sent.

[TestMethod]
public void YellowActor_Should_Send_String_Message()
{
    var props = Props.Create<YellowActor>(TestActor);
    var actor = ActorOfAsTestActorRef<YellowActor>(props);
    actor.Tell("test");
    var message = ExpectMsg<string>();
    StringAssert.Equals("test", message);
}

I used the TestActor property available in the test class as dependency for the yellow actor. And now I am able to verify that a message is sent using the ExpectMsg method. If I had let the ExpectNoMsg method the test would have failed because the actor system in my test context has received a message.

This is the end of this small introduction to testing with Akka.TestKit for Akka.NET.

Wrapping up

I am definitely not an expert regarding Akka.NET and even less with actor testing, so if you find mistakes regarding my approach feel free to teach me. I wanted to introduce testing early in order to make me think deeper when using Akka.NET. From this experience I learned that the actor model works as a whole and it is something to consider in order to avoid making mistakes.

I am also glad to have been able to write some tests for my actors without too much pain using the tool provided by the community, big thank to them for the hard work.

I will continue my journey with this technology and I will share my thoughts with blog posts. There is much to discover and to learn.

See you next time!

Testing is a developer job

lack-of-testingMaybe you have heard about the various discussions about Test-Driven Development (TDD). Is it worth it? Does it lead to good design? … In this blog post I will not speak about this kind of practice, just “classical” tests.

When I started my software developer career, I knew nothing about automated testing (unit or not). I wish I did, it would have save me a lot of time and a lot of trouble back then.

The pain of legacy code

I started my life as a software developer in a small company, I had no experience and I was alone on the project, which was several years old. I had to deal with a “big ball of mud” where I was afraid of touching anything because I did not knew anything about the consequences it might have.

Yet, I had to fix bugs and to implement new functionalities in order to improve the application. Of course, I did not test much my changes, only that the bug is fixed or the new feature works as expected on my local machine. And every time it had unseen consequences because the code is highly coupled and changing one part of the source code change the behavior elsewhere.

I wish I had tests at that time to prevent me from working in fear, fear of breaking things, fear of regression. But I’m also guilty in this story because the number of tests I have added during this period is ZERO… My contribution was to make the whole thing worse by adding more legacy code.

I now realise that I was behaving un-professionally, legacy system is a real pain to work with and it is my job as a software developer to avoid creating this kind of mess. We have the tool and practices to make things better, we can add tests, we can refactor bad written code.

Whatever… QA will test it

Now I work for a larger company with several development teams, each one of them has a QA to validate the work done by the developers. I think that having QAs within the teams is a wonderful thing, they will check new feature and potential regression before a production release.

But sometimes I feel like that some developers see this situation as an excuse to be lazy. “I just code, I won’t test it, this is the job of the QA”. What?! Are you serious? Your code does not even compile! Sure the QA will test it and they will just say: “It doesn’t work”. They can’t even test a single feature because the entire system cannot be built.

This might look far-fetched but I’ve seen situations like this one, several times unfortunately.

Sometimes, the code “works” but what has been asked is not done, the code has been written and it compiles. Yet, when opening the page (example of a website), the new element is not present… It’s the developer job to open the site to make sure that it works as expected from end to end, at least locally. Again, I’ve seen it many times, with my own work as well.

In my opinion, QA should find nothing, if they do I have failed at some point. If the issue is technical, I made a fault and I need to fix it ASAP and learn from it. What do I’ve missed? How to prevent that from happening again? Is there a unit test I can write? If the problem is a business issue (not doing was it is supposed to do), then again: what did I missed? Is there an acceptance test that needs to be written? Did I know all the domain related details? If not, why?

Always learn from your mistakes and a feature not validated by QA is a mistake. QAs are not hired to piss developers off, they are paid to make sure the products are viable from a quality point of view. We are not paid to write code, we are paid to automate process, and make them work! QAs are here to help, not to do our job.

I’ve been down this road and this is why I make this blog post, to share my experience and my failures. I love my job as a software developer and I want to be proud of what I’m creating, I want to be considered as a real software professional. There are ways to improve how we work, from a technical point of view and an attitude point of view.

Testing is a developer job, unit testing, integration testing, manual testing, all of them. It’s our job to make sure everything works.

See you next time!


Image credits:

http://www.mobilisationlab.org/six-testing-ideas-for-your-next-email-campaign/

Extreme Programming: Test Driven Development

Red Green RefactorAs professional developers our role is to produce high quality software for our clients. To achieve this goal we must make sure that our application meets the requirements defined by the business analysts and works as expected, without side effects.

To achieve this, you should rely on a full automated tests suite. And to make sure that this tests collection is complete and cover all your code base you can practice Test Driven Development (TDD).

TDD relies on repeating a short development cycle where tests are writing before production code. This process can be defined by the 3 following rules.

  1. Don’t write any production code until you have written a failing unit test.
  2. Don’t write more of a unit test than is sufficient to fail or fail to compile.
  3. Don’t write any more production code than is sufficient to pass the failing test.

Thinking ahead

By following these rules you can implement the required needs step by step. And by writing the tests first you also have to think from a caller perspective, you are a client of your own code.

With this paradigm shift, you have to think of what is actually needed in order to complete the case you are working on and nothing more. It is helpful to avoid any unnecessary over-engineering phase that might happen in the early development phase. This way you can follow the YAGNI (You Aren’t Gonna Need It) and the KISS (Keep It Simple, Stupid) principles, you only code what you need, nothing more.

Immediate feedback

TDD makes you write your tests suite at the same time as your production code. This allows you to be able to refactor the code easily, and you will do refactoring all along the way.

Refactoring is even one of the 3 phases of TDD: Red, Green, Refactor. You start by writing a failing test (Red), you write code to make it pass (Green) and you refactor the code to make it cleaner (Refactor). And of course you make sure that the tests still passed after the refactoring before writing a new failing test.

By practicing TDD, you consistently work with a safety net, if something is broken you know it right away!

Leading to better design

The TDD approach forces you to write testable software, therefore it is likely that the code will be less coupled than if it was written straight away without tests first.

A less coupled application is easier to maintain and easier to extend with new behaviors. This way you can improve your code base by adding advanced programming patterns during refactoring phases when you actually need them.

Due to this fact, TDD is sometimes decomposed as Test Driven Design instead of Test Driven Development. Yet to achieve better design when using TDD it is important to know programming patterns and programming principles (e.g. SOLID in oriented object programming).

Living documentation

One of the benefit of having a full tests suite for your production code is that it can work as documentation for it. By browsing the tests of your APIs the caller knows how to use it, how to instantiate the classes and what the expected outputs are for the available methods.

And this kind of documentation is always up to date since it is bound to the associated code it tests, if the code is updated so are the tests otherwise it fails.

More about TDD to come

When writing these lines I am still new to TDD and to be honest I don’t practice it every time, especially when working on legacy project (which would not have become legacy if developed with TDD or proper code coverage at least…). But I strive to follow the TDD rules when adding new behaviors to an existing project covered with tests.

I really want to learn more about this practice and this is why I work on increasing my TDD skills with some side projects. I will share the experience gained from these projects in a near future on this blog.

At the moment I am convinced that using TDD is very helpful to produce high quality software in a concise way. It helps me thinking of the exact behavior I want/need for my program. I like the fact it gives instant feedback and allow constant refactoring without having the fear of breaking anything.

See you next time!

Extreme Programming: Acceptance Tests

Check ListIn the chapter about user stories, I explained that they should not contain every details for the feature. Yet the development team needs these details in order to provide value. The details are discussed between the whole team members and you write them down using acceptance tests.

An acceptance test represent a specific scenario for the given user story. They are written by the business analysts and the testers. The developers take no part in the writing since these tests are business focused and are not technical at all.

The acceptance tests are written during the development phase of the user story, this is mandatory since they must passed in order to validate the entire user story.

These tests must be kept and run each time a new build of the application is made. Because working on a new user story can have impacts on previous ones and you want to make sure that they are not broken. Therefore you should find a tool that allow you to run your whole acceptance tests suite automatically.

A common language

Earlier I said that the acceptance tests are written by non-technical people. This allow you to make them understandable by everyone, your whole team is able to read them.

To do so, you can use the gherkin language which has been created to answer this problematic. This language uses a Given-When-Then structure to define the steps of a scenario.

Let’s see an example with the following basic user story:

As a visitor, I want to login, in order to access the website.

I will now create two different acceptance tests with the gherkin syntax for this user story.

Given a visitor,
When I log in with an existing account,
Then I am able to access the website
Given a visitor,
When I log in with an undefined account,
Then I am not able to access the website

With these scenarios I get more details for the expected behavior of the application regarding the user story to develop. You can use acceptance tests to test incorrect behaviors.

One of the benefit of the gherkin language is that you can use it with several testing framework to automate your tests suite and then you can run them automatically. You can use Cucumber to do so, or Specflow with .NET, this will bring your acceptance tests to a whole new level.

Acceptance tests as proofs

Acceptance tests allow the team to prove that the user story is working as expected. You have a list of scenarios defining the behavior of the feature. And by using an automated tool, you can detect any regression quickly.

These tests are bound to the code written by the development team and therefore are up to date. If the code of the application is updated so are the tests or else it is likely they will no longer pass.

Acceptance tests as documentation

The other benefit I like about acceptance tests is the fact that they can provide documentation for the application. Every members of the team are able to read them to gain understanding of the expected behavior, very helpful for newcomers.

And since it is written by the business analysts, it uses the correct terms for the business domain. This should help the whole team to communicate by using the same vocabulary. It’s a step toward the use of an ubiquitous language for a Domain-driven design (DDD) approach.

Acceptance tests are complementary with the unit tests, they provide a good understanding of a feature and are readable by everyone. They bring the business analysts and the developers closer to each others by providing them a share ground. Using acceptance tests require a good collaboration in your whole team.

In my opinion having them is a big plus to avoid regression, like all automated tests they provide a good safety net for future developments.

See you next time!

Dependency Injection and highly coupled objects

power-plugI consider that Dependency Injection (DI) is a very helpful pattern, I love to use it in order to reduce the coupling in my code and it helps me when writing unit tests. But sometimes the code depends on objects that are difficult or impossible to mock.

The HttpContext class of the ASP .NET MVC framework is one example of this kind of object.

I created the following Controller and View as examples:

public class IndexController : Controller
{
    [HttpGet]
    public ActionResult Index()
    {
        string[] languages = HttpContext.Request.UserLanguages;
        return View(model:languages);
    }
}
@model string[]
@{
    Layout = null;
}
 
<!--DOCTYPE html>
 
<html>
<head>
    <meta name="viewport" content="width=device-width" />
    <title>Index</title>
</head>
<body>
    <div> 
        @foreach (string language in Model)
        {
            @language
            <br/>
        }
    </div>
</body>
</html>

This view displays the languages preferences from the request for the visitor:

languages-preferences

Now, I want to test my Controller (even if there is no logic in my example) with the following code:

[TestClass]
public class IndexControllerTest
{
    [TestMethod]
    public void IndexActionTest()
    {
        IndexController controller = new IndexController();
        ViewResult view = controller.Index() as ViewResult;
        Assert.IsNotNull(view);
    }
}

I just want to check that the view is not null but the test fails. I get a NullReferenceException because the HttpContext property of the Controller is null. This happens because there is no web context when executing the test and it makes sense since the execution occurred in a test context.

The first thing that comes to mind to fix this issue is to set the HttpContext property with a mock. But I cannot do that because this property is read only and thus I am not able to set it when doing the instantiation of the controller in the test method.

And if you need to mock the HttpContext class, you cannot because it is sealed. To avoid this you can use the HttpContextBase abstract class instead but in a test environment you will have to implement it in order to mock it and you don’t want to do this. Why? Because it’s a pain to do, you will have to provide implementation for everything, it’s like creating an entire web context just for the test. And in my case I just need the user languages.

So? What now? Do we give up testing our controllers? Absolutely not, it is possible to achieve our goal without too much complications. From the beginning I tried to mock the wrong thing. What I need is the user languages not the HttpContext, so let’s remove this dependency. I created the following interface with the data my code will use:

public interface IWebContext
{
    string[] UserLanguages { get; }
}

And now I will inject this interface in my Controller and I will create a specific implementation that will use the HttpContext to retrieve the languages from the request:

public class RealContext : IWebContext
{
    private HttpContext _context;
 
    public RealContext(HttpContext context)
    {
        _context = context;
    }
 
    public string[] UserLanguages
    {
        get { return _context.Request.UserLanguages; }
    }
}
 
public class IndexController : Controller
{
    IWebContext _context;
 
    public IndexController()
        : this(new RealContext(System.Web.HttpContext.Current)) { }
 
    public IndexController(IWebContext context)
    {
        _context = context;
    }
 
    [HttpGet]
    public ActionResult Index()
    {
        string[] languages = _context.UserLanguages;
        return View(model:languages);
    }
}

Note that I created a parameters-less constructor that instantiate the dependency, without this constructor the ASP .NET MVC will not be able to create the Controller (it won’t even compile).

I can now update my test by using a mock for my interface:

public class MockContext : IWebContext
{
    public string[] UserLanguages
    {
        get { return new string[1]; }
    }
}
 
[TestClass]
public class IndexControllerTest
{
    [TestMethod]
    public void IndexActionTest()
    {
        IndexController controller = new IndexController(new MockContext());
        ViewResult view = controller.Index() as ViewResult;
        Assert.IsNotNull(view);
    }
}

My test is now passing! I removed the dependency between the test and the web context objects, I can now test the logic of my controller without having to set up an awful lot of mocks.

I encapsulated my specific logic inside an abstraction that is far easier to mock. This way I was able to reduced the coupling, I was also able to increase my code coverage and all of it without losing any behavior.

You can use this technique for other properties of the HttpContext like the user agent if you want to apply some logic on it and test it. Or also for static classes/methods (that you can maybe found in your legacy code).

I hope this will help you and as usual do not hesitate to leave a comment.

See you next time!

Extending mocking with Moq

simulator

In the last part of my Dependency Injection article I introduced the term of “mocking”. This kind of test double can be really powerful. Yet in my example I had to create 2 new classes (my mocks) to be able to test my functionality in order to reduced coupling. Here is the code used by the tests:

class MockNotifier : INotifier
{
    public MockNotifier()
    {
        NotifyHasBeenCalled = false;
    }
 
    public bool NotifyHasBeenCalled { get; private set; }
 
    public void Notify(User user)
    {
        NotifyHasBeenCalled = true;
    }
}
 
class MockRepository : IUserRepository
{
    public bool HasValidatedNotification { get; set; }
 
    public User GetById(int userId)
    {
        return new User { HasActivatedNotification = HasValidatedNotification };
    }
}
 
[TestClass]
public class NotificationServiceTest
{
    private NotificationService _notificationService;
    private MockNotifier _mockNotifier;
    private MockRepository _mockRepository;
 
    [TestInitialize]
    public void TestInit()
    {
        _mockNotifier = new MockNotifier();
        _mockRepository = new MockRepository();
        _notificationService = new NotificationService(_mockRepository, _mockNotifier);
    }
 
    [TestMethod]
    public void NotificationActivated()
    {
        _mockRepository.HasValidatedNotification = true;
        _notificationService.NotifyUser(1);
        Check.That(_mockNotifier.NotifyHasBeenCalled).IsTrue();
    }
 
    [TestMethod]
    public void NotificationDeactivated()
    {
        _mockRepository.HasValidatedNotification = false;
        _notificationService.NotifyUser(1);
        Check.That(_mockNotifier.NotifyHasBeenCalled).IsFalse();
    }
}

I think that being able to write its own mocks is a great exercise to understand Oriented Object Programming (OOP) in a testing context. But in a larger application it is likely that you will have an enormous amount of them, it is a lot of code to maintain. This is why I will introduce a mocking framework name Moq.

I used this nuget package for a few months now and it offers a lot of helpful functionalities. But I think that it can be a bit complex to use at first when people are not familiar with the mocking technique. Let’s see how the previous code can be refactored when using Moq:

[TestClass]
public class NotificationServiceTest
{
    private NotificationService _notificationService;
    private Mock<INotifier> _mockNotifier;
    private Mock<IUserRepository> _mockRepository;
 
    private User _fakeUser;
 
    [TestInitialize]
    public void TestInit()
    {
        _mockNotifier = new Mock<INotifier>();
        _mockRepository = new Mock<IUserRepository>();
        _notificationService = new NotificationService(_mockRepository.Object, _mockNotifier.Object);
        _fakeUser = new User();
 
        _mockRepository.Setup(m => m.GetById(It.IsAny<int>())).Returns(_fakeUser);
    }
 
    [TestMethod]
    public void NotificationActivated()
    {
        _fakeUser.HasActivatedNotification = true;
        _notificationService.NotifyUser(It.IsAny<int>());
        _mockNotifier.Verify(m => m.Notify(It.IsAny<User>()), Times.Once());
    }
 
    [TestMethod]
    public void NotificationDeactivated()
    {
        _fakeUser.HasActivatedNotification = false;
        _notificationService.NotifyUser(It.IsAny<int>());
        _mockNotifier.Verify(m => m.Notify(It.IsAny<User>()), Times.Never());
    }
}

First thing to be aware of is that the manipulated object are Mock instances and not implementations of the interfaces. It is possible to access these implementations by using the Object property of the Mock to inject the dependencies to a client object (NotificationService in this case). I also used the Setup method of the MockRepository to return a new instance of User when the GetById method is called.

Moq also provides a Verify method to check whether or not a method has been called and how many times. This is the method I used in the test to validate my test scenarios. You can notice that I no longer used NFluent, because in this case I don’t need it. Yet it is possible to use NFluent with Moq for the tests, they work really well together.

Last but not least, Moq provides powerful methods to match arguments, in my example it is the It.IsAny method. With this I can tell my Mock to accept any value as parameter because I am not testing it in my unit tests since it is irrelevant in this testing context.

This is just a quick overview of the possibilities offered by Moq and I encouraged you to check this awesome mocking framework.

See you next time !