I already spoke about acceptance testing in older blog posts (here and here) but without showing any tool available to write them, until now! In this article I will show how it is possible to write acceptance tests using Specflow.
This framework allows you to write executable scenarios using the Gherkin syntax which is non technical and can be used by domain experts, business analysts, testers. And then the developers implement the tests details alongside the feature covered by these acceptance tests.
Setting up
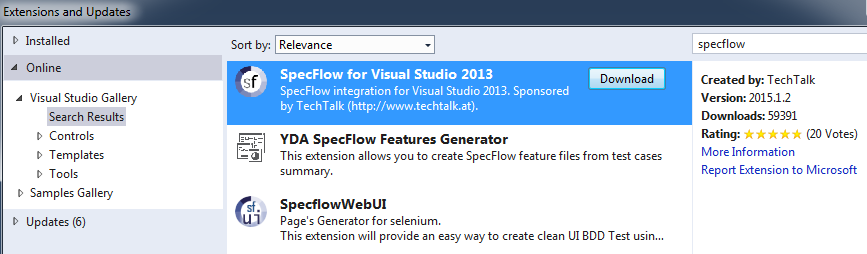
Specflow can work easily with Visual Studio, do to so you have to install the extension available in the extensions manager (see screenshot below).
This extension offers various file templates allowing to write test scenarios, I will come to this later. You will also need the nuget package for the test project where you will add the acceptance tests:
Install-Package Specflow
By default Specflow uses NUnit as unit test provider but you can change it through configuration if you want to, for example I will use MsTest for the demo, then I have to update the App.config file:
<configuration>
  <configSections>
    <section name="specFlow" type="TechTalk.SpecFlow.Configuration.ConfigurationSectionHandler, TechTalk.SpecFlow" />
  </configSections>
  <specFlow>
    <unitTestProvider name="MsTest"/>
  </specFlow>
</configuration>
You should now have everything needed to write your scenarios.
Adding a feature
It is time to create our first Feature file to define the behavior of our system. When adding a new file to the test project you should be able to choose the Feature File option (installed by Specflow):

This will create a .feature file containing scenarios definitions using the Gherkin syntax. For the example I have created a scenario testing the behavior of a simple calculator:
# Calculator.feature
Feature: Calculator
	I want to test the behavior of a Calculator

Scenario: Add two numbers
	Given I have a Calculator
	When I add 17 to 25
	Then the result should be 42
As you can see the syntax is very user-friendly and can be understood by everyone in the team (it’s just English!). Now if you try to run this test (the scenario) it will neither fail nor pass, it has no implementation therefore it will be skipped:
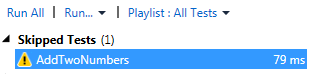
The test name has been generated from the scenario name, this allow you to make them clear. Scenarios can be written and committed/checked-in into the source control without adding failing tests which might break a build (depending on its configuration). Therefore they can be added early in the process and not at the end of the development cycle.
Creating the steps
In order to implement the scenarios of a feature, Specflow needs Step definitions to operate, you can use another file template to create a class defining the steps.

Or you can create the class yourself in order to obtain the following code.
[Binding]
public class CalculatorSteps
{
    [Given(@"I have a Calculator")]
    public void GivenIHaveACalculator()
    {
        ScenarioContext.Current.Pending();
    }

    [When(@"I add 17 to 25")]
    public void WhenIAddTo()
    {
        ScenarioContext.Current.Pending();
    }

    [Then(@"the result should be 42")]
    public void ThenTheResultShouldBe()
    {
        ScenarioContext.Current.Pending();
    }
}
The BindingAttribute allows Specflow to know that step definitions are present in the file, if you omit it there will be no binding between the feature and the steps, don’t forget it! It is also possible to generate the steps from the feature file using the right-click and the “Generate Step Definitions” option (very helpful).
With this implementation the scenario will still be skipped without failing, you now have a skeleton to work with. Now it is time for the developers to do their part of the work.
Implementing the code
I will now create a Calculator class with an Add method having two integer parameters and a Result property to expose the result.
public class Calculator
{
    public int Result { get; private set; }

    public void Add(int first, int second)
    {
        Result = first + second;
    }
}
I will also implement the steps to use my new Calculator class.
[Binding]
public class CalculatorSteps
{
    private Calculator _calculator;

    [Given(@"I have a Calculator")]
    public void GivenIHaveACalculator()
    {
        _calculator = new Calculator();
    }

    [When(@"I add 17 to 25")]
    public void WhenIAddTo()
    {
        _calculator.Add(17, 25);
    }

    [Then(@"the result should be 42")]
    public void ThenTheResultShouldBe()
    {
        _calculator.Result.ShouldBe(42);
    }
}
I used Shouldly to make my assertion in the last step. And now the test is green!

We have implemented our first test using Specflow, congratulations! Yet this demo is not over, there are a few more functionalities I would like to show.
Using scenario parameters
Right now our scenario test only one combination for the Add method and I definitely don’t want to write a scenario for each combination I want to test. Of course Specflow can handle this, using a scenario outline.
# Calculator.feature
Feature: Calculator
	I want to test the behavior of a Calculator

Scenario Outline: Add two numbers
	Given I have a Calculator
	When I add <first> to <second>
	Then the result should be <result>

	Examples:
	| first | second | result |
	| 17    | 25     | 42     |
	| 10    | 78     | 88     |
	| 2     | 25     | 27     |
	| 5     | -17    | -12    |
I will also need to update the step definitions to match the scenario outline, it is possible to add method parameters to steps and match them using regular expressions.
[Binding]
public class CalculatorSteps
{
    private Calculator _calculator;

    [Given(@"I have a Calculator")]
    public void GivenIHaveACalculator()
    {
        _calculator = new Calculator();
    }

    [When(@"I add (.*) to (.*)")]
    public void WhenIAddTo(int first, int second)
    {
        _calculator.Add(first, second);
    }

    [Then(@"the result should be (.*)")]
    public void ThenTheResultShouldBe(int result)
    {
        _calculator.Result.ShouldBe(result);
    }
}
My scenario can now take parameters and test several cases, I will have one test per example:
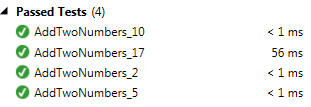
But as you can see the test names are not very relevant, Specflow use the first parameter value to generate these names and if you have several examples using the same example value it will be even less clear.
I know a trick to prevent that: adding a description parameter only for naming purposes.
| description | first | second | result |
| 17_25       | 17    | 25     | 42     |
| 10_78       | 10    | 78     | 88     |
| 2_25        | 2     | 25     | 27     |
| 5_minus12   | 5     | -17    | -12    |

It is not perfect but it might help. If you know a better way, feel free to share it.
Using existing steps
Once a step is implementing you can use it again in another scenario, or even another feature so you will avoid a lot of duplication. In my example I will now add a scenario to test the subtraction of the Calculator class.
Scenario Outline: Sub two numbers
	Given I have a Calculator
	When I subtract <first> to <second>
	Then the result should be <result>

	Examples:
	| description | first | second | result |
	| 17_59       | 17    | 59     | -42    |
	| 10_3        | 10    | 3      | 7      |
I will add the following method to the calculator class and the implementation of the new “when” step, the others already exist.
//Calculator.cs
public void Subtract(int first, int second)
{
    Result = first - second;
}

//CalculatorSteps.cs
[When(@"I subtract (.*) to (.*)")]
public void WhenISubtractTo(int first, int second)
{
    _calculator.Subtract(first, second);
}
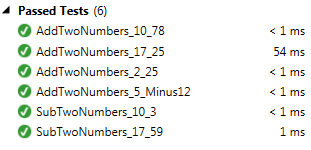
And this is it, I now have two more tests without having to write a lot of testing logic.
It is essential to reuse existing steps when working with Specflow in order to avoid too much duplication.
Using the scenario context
Now I want to get rid of the Result property in my Calculator class because I think it does not “feel” right, I prefer having methods directly returning the result.
public class Calculator
{
    public int Add(int first, int second)
    {
        return first + second;
    }

    public int Subtract(int first, int second)
    {
        return first - second;
    }
}
But now I have a problem inside my steps, how can I test the result if it is returned in another step? I don’t want to refactor the entire feature. The good news is that I don’t need to, I will change the step definitions without touching the feature file.
I will use the ScenarioContext to pass data from one step to another, like this:
[Binding]
public class CalculatorSteps
{
    private Calculator _calculator;

    [Given(@"I have a Calculator")]
    public void GivenIHaveACalculator()
    {
        _calculator = new Calculator();
    }

    [When(@"I add (.*) to (.*)")]
    public void WhenIAddTo(int first, int second)
    {
        var result = _calculator.Add(first, second);
        ScenarioContext.Current.Add("result", result);
    }

    [When(@"I subtract (.*) to (.*)")]
    public void WhenISubtractTo(int first, int second)
    {
        var result = _calculator.Subtract(first, second);
        ScenarioContext.Current.Add("result", result);
    }


    [Then(@"the result should be (.*)")]
    public void ThenTheResultShouldBe(int result)
    {
        var actualResult = ScenarioContext.Current.Get<int>("result");
        actualResult.ShouldBe(result);
    }
}
The tests are passing again, I was able to refactor my production code (the Calculator class) without modifying the scenarios. Specflow creates a separation between the feature specification and its implementation.
Time to conclude
This is the end of my introduction to Specflow, which I believe is a great tool for writing acceptance tests. It is easy to write feature scenarios you can use as executable specifications. In my example I use English but it is also available in several languages, so your domain experts should have a very good excuse for not writing them.
Specflow is also simple to configure to be used inside Visual Studio to be coupled with your favorite automated testing framework and there is even auto completion in the feature file for the Gherkin syntax or to find existing steps.
It has a lot more functionalities I did not mention in this blog post. It can also work with Selenium in order to create end-to-end scenarios for web applications. You now have the tool to practice Behavior Driven Development (BDD) with your team.
Let me know if you would like to know more about Specflow.
See you next time!

Hi , Its an amazing post but what i wonder is how could you also use the assert method instead of should be i used because it was causing error in my app(should not contain a definition).
How can i use it in my app can you please throw some light on it
LikeLike
Hello Aamir, thank you for your comment.
In the example I provided, if you want to use the regular assert methods instead of shouldly you just have to replace the following line:
actualResult.ShouldBe(result);with:
Assert.AreEqual(result, actualResult);For your app, I don’t really know what you are trying to achieve and I will need details, maybe you can try asking for some help on Stackoverflow, then the community and I will try to help you.
LikeLike
Hi Amir
You can use
Assert.AreEqual(result, actualResult);
by just importing the Microsoft.VisualStudio.TestTools.UnitTesting reference
LikeLike